
Set 0:
Set 1:
Set 2:
 Enhancement
 Flash Effect
 Equipment
 Global
 Combat
 Major
Major
 Minor
Minor
 Dimensional
 Planetary
 Science
 Haven
Haven
 Male
Male
 Female
 Attack
 Defense
 Movement
 Charm
Charm
 Energy
To get started more quickly, jump to page 14! (…then, refer to the index when you have questions, on pages 61 & 62.)
If you are familiar with Japanese Animation (Anime), you know you're in for a treat. If not, you're about to be introduced to a stunning art form. Ani-Mayhem was created with love by fans of Anime. To give you a taste of Anime's magic and incredible variety, we've made the things that drew us to Anime part of Ani-Mayhem. Each new game will plunge you into an Aniverse of your own creation. We hope you have as much fun playing Ani-Mayhem as we had creating it.
Dragon Ball Z is possibly the most popular Japanese animated series of all time. The manga has sold over 110 million copies. The anime series, 500 episodes and running, is the #1 children's show in Japan, Spain, France and Hong Kong. It debuted on U.S. television in 1996 on Saban's Kids Network and on home video, action figures, and Ani-Mayhem in August, 1997. Ani-Mayhem - Dragon Ball Z is based on the first 3 years of the Dragon Ball Z series. The original uncut versions of the programs were used.
One to five players can play, and each player will need his or her own deck. (Yes, it's a great solitaire game!) You can build your deck with cards from any of the three Ani-Mayhem sets now available.
The players construct a "Field" using Location cards. Beneath the Location cards, Item cards and Disaster cards are placed. Using teams of Character cards, each player will attempt to retrieve as many Item cards from the Locations as they can. Power cards can be used to strengthen Characters. Disaster cards will hinder success by stealing or destroying Items, and by fighting the Characters.
Abilities: There are five—
The sum of all the Attack abilities, including all bonuses of all Character or Disasters attacking a single target.
A Character is Bonked if its Health is reduced to 0 or below, but less than the negative of its starting Health. A Bonked Character is removed from play for 1 complete turn and then returns to play (completely healed) at their owner's Haven during the next Equip phase.
(card text term) It immediately cancels the effect of another card; that card (usually a Power card) is discarded.
The time it takes for a Disaster to make its way from where it starts on the Field to where it exits.
Total Attack minus Total Defense. Damage reduces a target's Health.
Disasters don't are not Bonked or Killed, only Defeated. A Combat Disaster is Defeated when its Health is reduced to 0 or below. A Non-Combat Disaster is Defeated when the conditions on that card are met. Defeated Disasters are discarded.
Remove a card permanently from the game.
Place the card into the owner's discard pile.
The length of time a card stays in play. (E.g., Alan draws a Disaster card that lasts 2 turns. That card stays in play through the end of the turn he drew and played it, then through the end of his next turn, and then is discarded.)
All Locations in this game (don't count Havens).
1 or more Characters controlled by 1 player.
A Character or Disaster's base Heath is equal to its basic Defense ability. Bonuses to Defense (i.e., from Power cards, Combat cards, etc.), do not increase Health. Damage to Health is accrued during Combat. After Combat ends, the Health of any Characters or Disasters still in play is restored immediately to full.
All cards that affect the Field. Bonked Character cards in a player's hand and cards in a player's Draw and Discard piles are not in play.
If a Character's base Health is reduced to negative its original level, the Character is Killed.
(card text term) The Character or Disaster can't move or Attack—it can only defend.
A card that is not played on any Locations. These cards are still in play. Global Effect cards are played Off the Field. Some Disasters state they are played Off the Field.
Characters have skills (e.g., Pilot or Chi) which enables them to Scavenge Locations, Defeat Non-Combat Disasters, use certain Equipment, etc.
This consists of a player completing the three Maintenance and three Play phases.
The game will end when all of the Item have been Scavenged from the Location or when one player (or the Disasters) acquires more than half of the Items.
The Disasters win(!) if they get the most Items (including ties). Otherwise, the player who possesses the most Items wins.
You can also win the game instantly by doing the following: When either Kami, Guru or the Guardian of the Earth cards are in play, simply bring 7 Dragon Balls to any one Location or Haven.
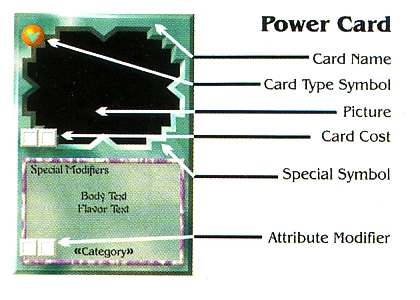
These are a Character's Attack, Defense, Movement, Charm, and Energy attributes. Characters which can transform (page 47) have two numbers listed (such as 2 / 5) rather than one, and a small picture of the Character in the transformed state.
Most Characters have 3-6 skills, from more than 40 possible skills.
These are special Characters that can only be brought into play when stated on their card.
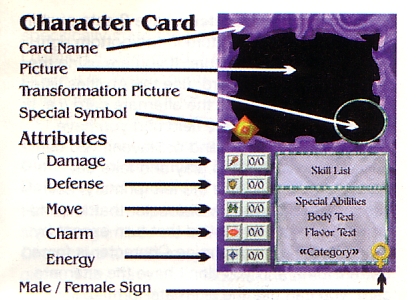
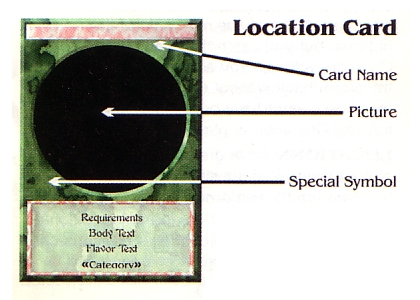
Shown are the skills a group of Characters need to Scavenge this Location, plus any additional information about the Location.
See page 44 for details on Planetary and Dimensional Locations, page 26 for Locations with Defense, and page 25 for Locations with Attack.
Havens are similar to Locations and are where your Characters start the game. Havens are also used to stockpile Equipment, extra Characters, and Items that you acquire through play. Havens cannot be Scavenged. Disasters can't move to a Haven. There is one Haven in each starter deck.
These are what Characters and Disasters are trying to retrieve. Item cards are kept face down until they are used.
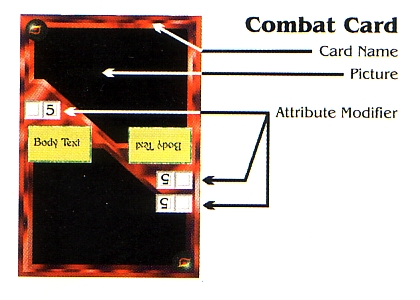
They are played during Charm and Physical Combats and enhance the combatants. One end of the card gives a Charm Combat modifier. The other gives a Physical Combat modifier. Be sure to use the correct end depending on whether you're in Charm (lips icon) or Physical Combat (eye icon).

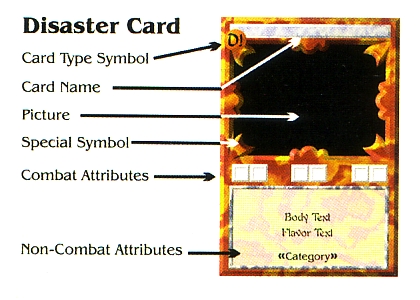
Disasters are either Major (D!) or Minor (D).
Disasters that have Attack, Defense and Movement abilities are "Combat" Disasters.
There are four types of Power cards: Enhancements, Equipment, Global Effects and Flash Effects. Requirements to use a Power card can be skills or categories.
Some Power cards cost Energy to use. The cost is shown in a button. Enhancements subtract that much Energy as long as the Character has the Enhancement. Flash Effects subtract that much Energy until the end of the turn the effect is used.
Power card ability modifiers preceded by a mathematical symbol (i.e., add (+), subtract (-), multiply (x), or divide (/)), alter the ability levels of the Character possessing the Power card. Modifiers with no mathematical symbol replace ability levels.
These give Characters additional or increased skills and/or abilities. Once played on a Character, they can never be transferred to another Character and are only removed if the Character is Killed or Bonked or by a card that specifically removes an Enhancement.
These bestow an effect on a Character as long as it carries the Equipment. A Character can carry as many Equipment cards as you wish, but cannot use more than one Equipment bonus to the same ability per turn (i.e., if you are using a gun that gives +3 to Attack and you get a Hardsuit that gives +1 to Attack and Defense, you may use the Hardsuit's Attack bonus or the gun's but not both. Equipment are not Items.
When you play a Global Effect, play it off to the side of the Field. It affect all of your Characters that are on the Field.
These can be played at any time during the game except during the Draw phase. Once a Flash Effect is played, it takes effect and then is discarded. If a Flash Effect has an Energy cost or requirement, a Character at the Location where the Flash Effect is played must pay the Energy cost or requirement.
This has mini-pictures of the Characters found in this set. Cut up the card and use the chits to represent the Locations of your Characters, or as counters.
Start by sorting your cards by type: Characters, Locations, Havens, Items, Disasters, Combats and Power cards. Remove duplicates as follows: You may use only 1 of any Character or Location card, up to 2 of any Power card and up to 3 of any Item or Combat card.
| Card Type | Quantity |
|---|---|
| Starting Characters | 4 (min.) |
| Haven | 1 |
| Locations | 7 (min.) |
| Items | 7 (min.) |
| Disasters | 20 |
| Power & Add'l Characters | 20 |
| Combats | All |
You may use additional Power cards, but add 1 Disaster to your deck per 2 Power cards added. You'll probably want to have 2-4 additional Character cards.
Super-Saiyan Character cards aren't counted in deck construction (set them aside instead).
Hint: It is easier to keep track of your cards if you place Location, Disasters, and Items on the Field, facing you. As your Characters acquire Items, Equipment, Enhancements, etc., place them with the Character card they belong to.
Each player: Choose four starting Character cards and place them face down in front of you.
Each player: Shuffle and set aside all of your Combat cards (red backs) face down—becomes your Combat Draw pile.
Each player: Shuffle your Power cards and extra Character cards. This is your Draw pile. Draw 7 cards. This is your beginning hand.
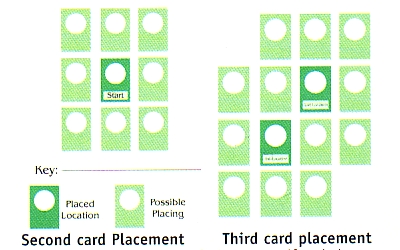
Each player: Shuffle all of your Location cards (green backs). Each player takes turns drawing and then placing a total of 7 Location cards (each), on the Field face up:
The first Location is placed anywhere on the Field.
The rest are placed adjacent to any card already on the Field.
After every player has placed at least one Location, a player may choose to place their Haven instead of placing a Location for this round of placement.
Each player: Shuffle your Item cards and then take turns placing 1 Item card face down beneath all of the cards at any of your Locations on the Field. No peeking! Only 1 Item per Location.
Put away any unused Items. [E.g., You shuffled 11 different Item cards. After placing 7, you've finished; the rest won't be used in this game.]
Each player: Shuffle your Disaster cards and then take turns placing 2 Disasters at a time face down beneath any other player's Location on the Field. No peeking. Only 2 Disasters per Location.
Each player: Shuffle your remaining Disasters into your Draw pile.
Each player: Turn your starting Character cards face up. Place chits representing your 4 starting Characters in your Haven.
Place your Locations facing yourself to help keep track of who owns which cards.
Game play consists of Major stages, the Maintenance phases, and followed by the Play phases.
Choose who goes first. The player to the left goes second, etc. On the second turn, the player to the left of the one who went first last time goes first this time. Continue to rotate who goes first clockwise every turn.
On the first turn, skip the Maintenance phases and go directly to the Play phases.
For the Discard and Draw phases, everyone plays simultaneously. For the Disaster phase, take turns moving the Disasters.
Each player may discard any cards in their hand and/or any of their Characters in their Haven.
Each player draws 1 card at a time from their Draw pile until they either have 7 cards in their hand, or draw a Disaster.
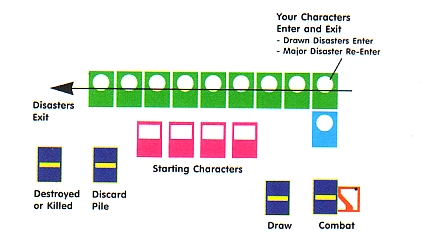
If a Disaster cannot affect the Field, discard it and keep drawing. Otherwise place it at the top right corner of the Field ("enter" spot of Disaster Movement Path diagram). Some Non-Combat Disasters might not have an appropriate target (i.e., Shuttle Crash, and there are no vehicles in play), whereas Combat Disasters always affect the field.
If a player runs out of cards, they should reshuffle their Discard pile to form a new Draw pile. However, do not shuffle Item cards that have found their way, through play, into your Draw pile (they stay in the Discard pile).
Disasters capable of movement, move a number of Locations equal to their Movement ability. They always move their full Movement capability each Maintenance phase. Move the Disaster closest to moving Off the Field first then the next closest and so on. A drawn Disaster is moved onto the Field last. Player's take turns moving the Disasters.
If you draw a Disaster with Movement ability from your Draw pile during the Draw Phase, it enters the field at the top Location of the column to your right. It moves down that column, counting 1 Location per movement point. When it gets to the bottom, it goes straight to the top of the next column to the left. It will then move down that column 1 card at a time and so on. (See diagram, page 20.)
When a Disaster gets to the bottom Location in the last column to your left, it moves Off the Field. This is the end of its cycle. If it carried an Item, the Item is Destroyed (and counts towards the Disasters winning the game). Minor Disasters are discarded. Major Disasters re-enter the Field at the top of the column to your right and finish their movement (if any).
Moving a Disaster On or Off the Field takes 1 Movement point. Moving a Major Disaster from the bottom left Location to the top right Location takes 1 point of Movement.
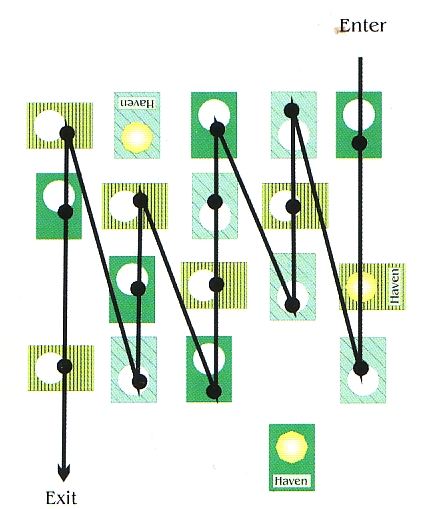
Disaster Movement Path: The above diagram shows how Disasters move on the Field. Each large dot on a Location along the path is counter for movement. Once it reaches the arrowhead at "Exit," it is at the end of its cycle. Notice that Havens are ignored.
Important: Update Disaster time for Disasters with time limits. If expired, discard. You can use counter chits for this.
Only Combat Disasters pick up Items and they can only carry 1 Item at a time. If a Combat Disaster does not already have an Item, it will pick up an Item from the first Location it comes upon which has one. A Disaster will not reveal or use an Item.
If a Disaster comes upon a Location where there are Characters and at least one of them has an Item, the Disaster will automatically attack a random Character carrying an Item during each Combat round. If the Disaster defeats a Character, it drops the Item it was carrying (if any) beneath the Location, takes the Item the Character had, and immediately moves its full Movement capability.
If a Disaster comes upon a Location where there are Characters, but none has an Item, it will continue its movement, ignoring them. However, if this Location is where the Disaster ends its movement, it will initiate Combat automatically, attacking a random Character each Combat round.
If a Character defeats the Disaster, the Item the Disaster had been carrying is placed beneath the Location (under the Disasters there, if any).
If you enter Combat with a Disaster that has a Charm ability it will automatically charm attack first and initiate Physical Combat second.
When a Non-Combat Disaster completes the action described in its text box, it is discarded.
Disasters without Movement ability do not move. When drawn from a deck, they are played on the nearest Characters encountered along the Movement path. They take effect immediately.
A Disaster card which states that it "Moves Once" only moves if it is drawn from a Draw pile. When turned up during Scavenging, it doesn't move. It stays at the Location it lands on for the remainder of the game or until it is defeated.
Note: Disasters beneath Locations (i.e., face down) are not considered to be in play (yet).
When it is your turn, cycle through the Equip, Movement and Scavenge phases. When completed, it becomes the turn of the player to your Left.
You may do any or all of the following in any order:
Place any Characters from your hand to your Haven. You may have any number of Characters in your Haven but no more than 6 on the field at any one time.
Place any Bonked Characters who have been out of play for a full turn into your Haven.
Play one Enhancement card—on any Character of yours on the Field or in a Haven.
Play one Equipment card—into your Haven or on a Character at your Haven. Play any Equipment in your Haven already on a Character at your Haven.
Play one Global Effect card—Off the Field. [Global bonuses affect all of your Characters.]
Limits: Each Character may have a maximum of 2 Attack, 2 Defense and 1 Movement bonus at any time. Don't count permanent bonuses such as training.
Your Characters enter the Field from your Haven.
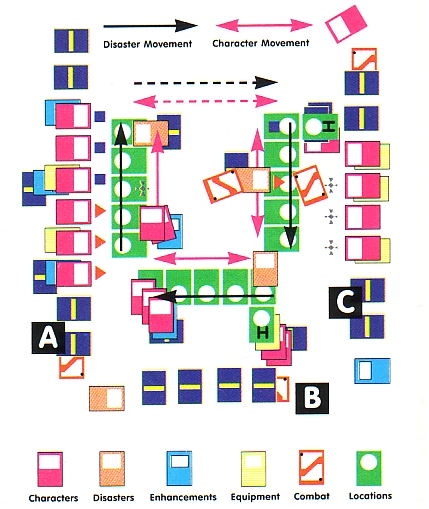
Each Character can move a number of Locations up to its Movement ability each turn. Moving from 1 Location or Haven to an adjacent Location or Haven takes 1 point of Movement. Moving a Character from a player's hand to a Haven takes no Movement.
If Characters move to/through a Location that has a Combat Disaster (face up), the Disaster will attack (random Characters having Items first, otherwise any random Character).
A group of Characters is limited to the Movement ability of its slowest Character. Unlike Disasters, Characters can move in all eight compass directions, as long as there is a Location or Haven there. You cannot end your movement at another player's Haven.
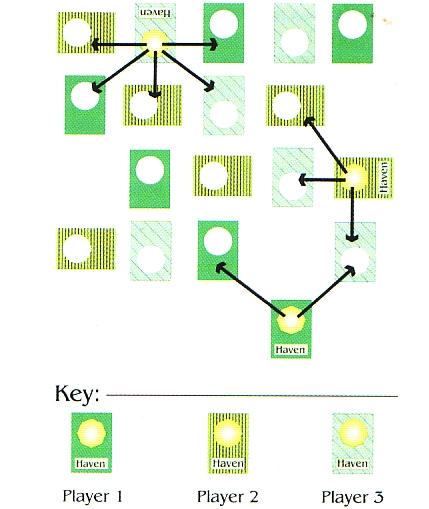
The above diagram shows which Locations a Character may move to from a Haven on to the Field. Characters may move the same way from Location to Location. Locations laid out to keep track of which player owns any particular Location.
The Field does not wrap-around (unless moved off Field by a Disaster). Characters cannot move to a Planetary or Dimensional Location unless they have such capability (see page 44).
If a group of Characters, without the required skills, stops on a Location with Attack listed in the text box, the Location Attacks each of the Characters at the Location from that group. The Location Attacks once per turn. If the Characters are in Combat with a Disaster or other Characters, the Location also Attacks once per Combat round.
If your Characters have the skills listed on the Location they are at, they can attempt to Scavenge that Location. [Occasionally, you may play Flash Effects at this time to give your Characters skills they need to be able to Scavenge the Location. Other Flash Effect cards will help you defeat Disasters.]
To begin Scavenging, turn over one of the Disasters underneath the Location. (It remains face up until defeated.)
If it is a Non-Combat Disaster, you must meet or overcome its requirements (although some Non-Combat Disasters will take effect without directly hindering a Character). If a Disaster cannot affect the Field, it is automatically defeated.
If it is a Combat Disaster, you will have to Combat it to Defeat it. You can run away now but the Disaster will get to Attack you once unanswered.
If you defeat the Disaster, discard it. You may continue to Scavenge by turning over the next Disaster (if any) that is under the Location.
If a group of Characters, without the required skills, stops on a Location with Defense Listed in the text box, they can Scavenge the Location if they can Attack the Location with more Damage than the Location's Defense.
If you defeat all the Disasters at a Location, you may retrieve the Items and Equipment cards at the Location. Assign them to one (or more for vehicles) of the Characters at the Location as you wish. Items and Equipment can be used immediately.
Krillin, Atlia, and Chiao-Tzu are at the Desert Battleground. Skills are:
| Character | Skills |
|---|---|
| Krillin | Martial Arts x2, Pure Heart, Chi, Flying, Priest |
| Atlia | Survival, Strength, Weapons, Swordsman, Pure Heart |
| Chiao-Tzu | Royalty, Phase, Martial Arts, Flying, Chi |
| Location | Skills Required to Scavenge |
|---|---|
| Desert Battleground | Flying x2 or Climbing & Survival |
While Atlia has "Survival", no one has "Climbing". Fortunately, this Location requires "Flying x2" or "Climbing & Survival", and both Krillin and Chiao-Tzu have "Flying," so the entire group passes the test. All 3 can enter and Scavenge.
Combat consists of 1 round of Charm Combat followed by an unlimited number of Physical Combat rounds. All Attacks happen simultaneously but cards initiating an attack are described as "attacking" and cards being attacked are "counter-striking." A counter-strike is still an attack. Attack and counter-strike happen in the same Combat round.
For your first few games of Ani-Mayhem, ignore Charm Combat (page 30) and protecting (page 37), and no attacks are allowed between two players.
During each Combat round, up to 4 Characters can attack a Major Disaster, and up to 3 Characters can attack a Minor Disaster or another Character.
In Physical Combat between Characters and Disasters, the Disaster initiates Combat every round.
Start by noting the starting base Health for both Disasters and Characters. This is equal to their Defense ability excluding modifiers (Enhancements, training, etc.). Only modifiers specifically stating Health affect the starting base Health.
Determine who's attacking who for this round (and this is redone every round). If the Disaster was uncovered during Scavenging, the Disaster will attack a random Character having an Item. If no Character has an Item, it will attack any random Character.
The Disaster chooses its target first, then the player chooses which Characters will counter-strike.
Draw 1 Combat card from your Combat Draw pile for the Disaster and another for any Characters being attacked, in that order [If you run out of Combat cards, shuffle them.] If the battle is between Characters, each player draws Combat cards for their own Characters.
Add up all of the Attacks against one Character or Disaster, including bonuses. Subtract the Defender's total Defense (think of it as armor). Any positive number left is the Damage the Defender takes to its Health, and is subtracted from the Defender's Health. [Read this paragraph carefully.]
Combat continues until: 1) All Characters are Bonked or Killed (on one side if it's Characters vs. Characters); 2) A Disaster is defeated; or 3) Characters on one side Run Away (Disasters don't Run Away).
Damage to Health is cumulative each round for the duration of that Combat. After Combat ends, Health is completely restored for all Characters and Disasters remaining in play.
If a Character's Health falls below 1, it is Bonked.
If a Character is reduced to negative its base Health in a single Combat round, it is Killed. (See table below.) Discard any Killed Characters.
A Bonked Character's Items and Equipment fall beneath the Location (and await Scavenging).
| Health | Def. | Attack | Damage | Result | |
|---|---|---|---|---|---|
| Round 1 | 4 | 4 | 3 | 0 | 4 |
| Round 2 | 4 | 4 | 7 | 3 | 1 |
| Round 3 | 1 | 4 | If 5 | 1 | 0, Bonked |
| If 6 | 2 | -1, Bonked | |||
| If 8 | 4 | -3, Bonked | |||
| If 9 | 5 | -4, Killed |
If you want your group to Run Away from Combat, say so at the beginning of any Combat round. Any Characters or Disasters you are in Combat with inflict a Final Attack (your Characters do not counter-strike). Move remaining Characters 1 Location (and you can't Scavenge that Location this turn).
If there is conflict between a rule in the rulebook and card text, obey the card. (Some cards break the rules.)
…End of Basic Rules
There are some lengthy examples beginning on page 32.
Beginning of Advanced Rules…
Characters may Charm Combat other Characters or Disasters who have a Charm ability listed. If Characters enter Combat with a Combat Disaster with Charm, the Disaster will automatically initiate Charm Combat first.
A Character can be in Charm Combat any number of times in a given turn, but may only initiate it once per turn. Characters cannot team up for charm attacks or defenses.
Charm Combat lasts one round. Draw a Combat card for the Disaster. Do the same for your Character. Apply the Charm effects of the cards.
If the attacker has a higher total Charm (including all bonuses) then the target is Charmed. If the defender has a total Charm twice that of the attacker, the attacker is Charmed.
If the Charm Combat succeeds, you may make the Disaster or Character do one of the following: Hand over an Item; Move (up to its maximum) in any direction; Or, attack a Character or another (face up) Combat Disaster at this Location,
If you lose Charm Combat against a Disaster, that Character may not attack the Disaster until the Disaster attacks that Character.
If all the Characters at a Location lose Charm Combat with a Disaster, the Disaster will take an Item from the Location if one is there and leave on the next turn.
The differences: Each player draws their own Combat card. First, the attacking player has one of his Characters Charm Combat an opponent. Then, the opponent may Charm Combat one of the attacking player's Characters. This repeats (i.e., alternates) until every Character who wants to Attack in Charm Combat has done so.
If the charming Character loses, nothing happens, unless it loses by a number equal to its own base Charm. In that case, the charm backfires and the target gets to make the Disaster/Character who attempted the charm do any one of the following: Hand over an Item; Move (up to its maximum) in any direction; Or, attack a Character or another (face up) Combat Disaster at this Location.
Any Character can break a charm by charm attacking the Charmed Character with twice the amount it was Charmed by, or by defeating the charming Character in Charm Combat that round. (e.g., Washu loses a Charm Combat with Dailey Wang by 2 points. Dr. Tofu charm attacks Washu to break the charm. If Tofu wins by 4 or more points, the charm is broken and Washu continues as if nothing had happened. Alternately, if Tofu can defeat Dailey in Charm Combat this round, the charm is also broken.)
Here is a basic scenario covering Scavenging and Combat between Characters and Disasters. See page 38 for Combat between two player's Characters.
Tom has a group consisting of Baby Gohan, Krillin, Yamcha, and Baba. Krillin has +1 Attack and +1 Defense from a Heavy Gravity Training Enhancement. Yamcha is driving Yajirobe's Hog (Equipment). Baba is carrying a Rocket Launcher (Equipment).
They decide to go into Kami's Floating Palace. The Palace requires "Martial Arts x3" or "Chi x2 & Magic." Only Krillin and Yamcha have Martial Arts, but Baby Gohan, Krillin and Yamcha all have "Chi" and Baba has "Magic", so they can do it.
Tom turns over the first Disaster, a Hungry Dinosaur (Minor Combat Disaster). Since they encountered it during Scavenging, the Disaster automatically Attacks.
If Tom thinks the Dinosaur is too powerful, Tom may opt to have his Characters Run Away. The Dinosaur would get one attack on Tom's Characters, who could not counter-strike. Tom's Characters would then have to Move 1 Location away (and cannot Scavenge again until the next turn). The Dinosaur would pick up the Item at the Cafe and take a full Movement (in this case, 1 Location) immediately.
The Dinosaur is a rather wimpy Disaster (yes, in this game a dinosaur is wimpy), so big Tom decides to take it on.
The +1 Defense bonus Krillin gets from the Heavy Gravity Training Enhancement does not affect his Health.
| Attack | Defense | Health | |
|---|---|---|---|
| Characters | |||
| Baby Gohan | 1 | 2 | 2 |
| Krillin | (4+1)=5 | (3+1)=4 | 3 |
| Yamcha | 3 | 3 | 3 |
| Baba | 1 | 2 | 2 |
| Disaster | |||
| Hungry Dinosaur | 4 | 4 | 4 |
Since none of the Characters have Items, the Dinosaur will attack a random Character. Use a die to choose a random Character, or pick up all the Characters and shuffle them, letting another player pick one.
The Dinosaur attacks Krillin.
The Dinosaur is a Minor Disaster, so a maximum of 3 Characters can attack it each Combat round. Tom chooses Baby Gohan, Yamcha and the enhanced Krillin.
Tom draws 1 Combat card for Krillin (Character) and 1 for the Dinosaur (Disaster), in that order.
The Dinosaur gets Just a Trim, which adds 3 to its Defense (4+3=7).
Krillin gets a Flying Kick which adds 1 to his Attack (5+1=6).
The Dinosaur delivers its Attack of 4. Krillin's Defense is 4. He takes no damage.
The Characters collectively counter-strike the Dinosaur with an Attack of 10 (Krillin = 6, Yamcha = 3 and Baby Gohan = 1). With its Combat Card bonus, the Dinosaur's Defense is 7, it takes 3 points of Damage to its Health.
New Attack, Defense and Health stats are:
| Attack | Defense | Health | |
|---|---|---|---|
| Characters | |||
| Baby Gohan | 1 | 2 | 2 |
| Krillin | (4+1)=5 | (3+1)=4 | 3 |
| Yamcha | 3 | 3 | 3 |
| Baba | 1 | 2 | 2 |
| Disaster | |||
| Hungry Dinosaur | 4 | 4 | 1 |
Put the used Combat cards face up under your unused Combat cards.
The Dinosaur attacks Baba this time. Baba, Yamcha and Krillin will do the counter-striking this time.
Baba fires off her Rocket Launcher for a +3 Attack bonus (Flash Effects must be played before the Combat cards are drawn). The Racket Launcher has only one use and must now be discarded.
Except that Tom also has a Reload Flash Effect. Tom plays that now, preserving the Rocket Launcher.
Draw 2 new Combat cards for Round 2. Baba gets an Incoming (-3 to Defense = 0 (Defense can't go below 0)). The Dinosaur gets a Flying Head Butt (+3 to Attack = 7).
The Dinosaur hits Baba for 7. She takes (7-0)=7 points of Damage, which lowers her current Health of 2 to below 0, so she would be Bonked. However, the massive hit of 7 takes Baba below -2 (negative her base Health of 2), so she's Killed! Baba is removed from play. The Rocket Launcher she was carrying falls beneath the Location. If there are any other Disasters beneath the Location, the Launcher is placed below them also.
Since Attack and Defense are simultaneous, however, Baba still participates in the counter-strike, with the bonus from her Rocket Launcher intact.
The Characters hit the Dinosaur for a total of 12 Damage this round. Its Defense (normal this time, since it got no Defense bonus from the Flying Head Butt Combat card) absorbs 4 points of damage, leaving 8 points that pummel the Dinosaur. It is Defeated and goes into owning player's discard pile.
Tom can now decide to go on or stop Scavenging the Location. If Tom decides to stop Scavenging, that's the end of the turn for those Characters. They'll stay on the Location, but to Scavenge it again on a subsequent turn, they'll need to get a new Character with either a "Magic" or a "Martial Arts" skill, since Baba is no longer around. If Tom wants to continue to Scavenge, he may do so (the group only needs to meet the requirements when they start the Scavenge). If Tom's Characters succeed in defeating all the Disasters beneath the Location, they will get any Items there. They can also pick up the Rocket Launcher again.
Disasters are fought one at a time. If none of the Disasters at a Location states it attacks automatically, a player may choose which Disaster to Combat first. Attacking one Disaster does not necessitate Combat with another Disaster at the same Location. Disasters are solitary by nature and if a Disaster wasn't going to attack you anyway, it won't do so just because you are fighting with another Disaster at the same Location.
If Characters are carrying Items, or if more than one Disaster at a Location attacks automatically, Disasters attack in the order they arrived at the Location. If Disasters arrived simultaneously, the most powerful one attacks first. Calculate by the Disaster's Attack ability, then Defense ability, then Movement ability if needed.
Each Character in the Combat can either attack or protect another Character.
A player must declare target Characters for any of their attacking Characters. Up to 3 Characters can team their attacks against the same target. Up to 2 Characters can protect another Character.
If a Character is protecting another Character, the player must declare which Character it is protecting. The Defense ability of the protecting Character is added to that of the Character it is protecting. A Character which is protecting another Character cannot Attack. The protecting Character takes half the damage that gets through the combined defense, the target takes full damage. Protecting Characters take a minimum of 1 point of Damage per Combat round.
Players take turns declaring a target to attack or protect, with the attacking player going first.
Yamcha (Defense = 3), protects Goku (Defense = 5). Now, Goku's Defense = 8 for that Combat round. If Yamcha is is wearing Nene's Hardsuit (+1 Defense) And Goku has Linna's Hardsuit (also +1 Defense), Goku's Defense = 10 for that Combat round.
The attack on Goku = 12. He takes 2 points damage to his Health (12 - 10 = 2). Yamcha takes 1 point of damage to his Health. Goku may counter-strike this round, but Yamcha may not.
Goku is attacked again. Yamcha continues protecting. The attack on Goku = 1. He takes 0 points of damage to his Health (1-10 < 0). Despite the low Level of the attack, Yamcha still automatically takes 1 point of damage to his Health.
Amanda and Ben are both at the Alien Landing Site, and they both want to Scavenge it. Neither is willing to bow to the other, so they rumble.
Amanda is playing with Nail, Goku, and Master Roshi. Ben has Trunks, Chi-Chi, Bulma, and Lunch.
| Attack | Defense | Health | Charm | |
|---|---|---|---|---|
| Amanda | ||||
| Nail | 3 | 3 | 3 | 2 |
| Goku | 5 | 4 | 4 | 3 |
| Master Roshi | 2 | 3 | 3 | 3 |
| Ben | ||||
| Trunks | 3 | 3 | 3 | 3 |
| Chi-Chi | 2 | 2 | 2 | 3 |
| Bulma | 2 | 2 | 2 | 4 |
| Lunch | 3/1 | 3/1 | 3 | 5/2 |
Amanda (who initiated the Combat) chooses not to charm attack. Ben declares Lunch will charm attack Goku.
Amanda draws a Combat card for Goku. Ben draws a Combat card for Lunch. Both use the Charm effects.
Goku gets Bad Breath, which subtracts 2 from Lunch's Charm. Lunch gets Zen Experience (+1 Charm).
Goku's Charm is still 3 and Lunch's modified Charm is 4 (5 - 2 + 1 = 4). With a wink and a dreaded hair flip, she charms him, and can make him hand over an Item; Move in any direction; or, attack any Character or (face up) Combat Disaster at this Location.
First though, any of Amanda's Characters can Charm Combat either Goku or Lunch to try to break the charm. Amanda declares that Nail will take on Goku. In order to break Lunch's control, Nail will have to beat Goku by at least twice what Lunch Charmed Goku by. In this case, Lunch beat Goku by 1, so Nail will have to win by at least 2.
Amanda draws a Combat card for Nail. It's a Kai Laughing (+2 Charm = 4). She draws a Gusto for Goku (+1 Charm = 4). Suddenly however, Amanda reveals Nail is carrying the Baby Dragon, an Item with a +2 Charm bonus. Nail's Charm is now 6 to Goku's 4. Nail wins by 2, which is twice what Lunch won by. He snaps Goku out of his befuddlement and cancels Lunch's charming assault.
If the charm hadn't been broken, Lunch would have ordered Goku to attack Roshi.
Amanda now has the option to charm attack one of Ben's Characters, but again passes. Ben can then attempt to charm attack, but he also passes. Charm Combat is complete.
Players take turns declaring who is attacking and protecting, with Amanda, who initiated the Combat, declaring the first one:
Declare Attacks first:
Declare protecting second:
Ben has Bulma protect Lunch. (Bulma isn't being attacked so she's free to protect Lunch or Chi-Chi).
Amanda draws an Awesome Kick for Goku (+1 Attack = 6) And a Just A Trim for Roshi (+2 Defense = 5).
Ben draws a Gut Punch for Trunks (+2 Attack = 6), But an unfortunate Strategy Reformulation for Chi-Chi (-1 to Chi-Chi's OWN Attack = 1).
Goku hits Chi-Chi with 6. Chi-Chi's Defense and Health are 2. Since Chi-Chi this brings Health to -2 (which is negative her base Health) in damage in this one attack, she is not just Bonked, but Killed and must be discarded (after her counter-strike).
Due to the Face Slam, Chi-Chi's total counter-strike on Goku is 1. Goku takes no damage and apologizes profusely to Chi-Chi as he flips her into Ben's discard pile.
Roshi reveals a Dimensional Hammer (a +2 Attack Equipment that can be played like a Flash Effect from Ani-Mayhem Set 0…Amanda has been hip to this game for a while now). Roshi's Attack is 2 + 2 = 4, and Nails Attack is 3. Together, they hit Lunch for 7. Bulma, protecting Lunch, adds her 2 defense to Lunch's 3 for a total 5. Lunches Health remains 3 (equal to her base defense) regardless of any defense bonuses. Lunch takes 2 points of Damage to her Health. She survives, but her Health is now 1. Bulma takes half the Damage Lunch took (=1) for protecting. Her Health is now 1.
Trunks attacks Roshi. Lunch adds her counter-strike for a total of 9. Roshi's defense is 3 + 1 (from the Just A Trim) = 4. (His Health is still equal to his base Defense of 3.) Roshi takes 9 - 4 = 5 points of Damage, reducing his Health to -2, which Bonks him, but doesn't Kill him (to be Killed, he would have to be reduced to the negative of his Health, or at least a -3). Amanda places Roshi Off the Field. The Dimensional Hammer falls beneath the Location and both of the Disasters there. Since Roshi attacked Chi-Chi, he does not get a counter-strike on Trunks.
Amanda and Ben each put their used Combat cards face up beneath their unused Combat cards (when all of your Combat cards have been used, re-shuffle them and use them again).
| Attack | Defense | Health | |
|---|---|---|---|
| Amanda | |||
| Nail | 3 | 3 | 3 |
| Goku | 5 | 4 | 5 |
| Master Roshi | 2 | 3 | 0 |
| Ben | |||
| Trunks | 3 | 3 | 3 |
| Chi-Chi | 2 | 2 | 2 |
| Bulma | 2 | 2 | 1 |
| Lunch | 3/1 | 3/1 | 1 |
Declare Attacks first:
Declare protecting second:
Ben draws a Combat card for Bulma. She gets a Back Kick (+3 Attack and she gets to draw another Combat card). Unfortunately, she gets an Any Minute Now (+1 Defense, but her Attack = 0). Amanda draws a Pummel for Goku, which (+4 to his Attack = 9).
Goku and Nail Attack Bulma with 9 + 3 = 12. Her Defense is 2 + 1 from the Combat Card + 3 from Trunks' protection = 6. Damage is 6, reducing her to -5 Health, so she is extremely Killed. Ah, but the excitement continues, as the poor protecting Trunks takes half Damage, in this case 6 ÷ 2 = 3, which is enough to reduce him to 0 Health. He is Bonked. Goku and Nail blow smoke in his face and do a quick high five.
Before she wanders off to be dead, Bulma gets a counter-strike on Nail. Bulma and Lunch attack Nail for a total of 5. He takes 2 Damage, but survives with Health 1, and shimmies again.
Which leaves Lunch holding the bag (pun intended). Further, Lunch's special nature now kicks in. Every third turn or Combat round, Lunch SNEEZES and turns into a mousier, weaker version of her wildcat self. If Amanda wants to continue Combat, she'll need to do so with Lunch having a 1 Attack and 1 Defense this round instead of a 3/3 (her Health is still 3). If she decides to run, Ben will get one unanswered attack first. But we will leave that to your imagination.
These have a Planetary symbol in the lower left of the Picture window. A group of Characters cannot stop on a Planetary Location unless at least 1 Character in the group has a Planetary symbol or a Power card with the Planetary symbol. All Disasters can stop on Planetary Locations,
These have a Dimensional symbol in the lower left of the Picture window. No Character can stop on a Dimensional Location unless that Character has a Dimensional symbol or a Power card with the Dimensional symbol. All Disasters can stop on Dimensional Locations.
Locations cannot be discarded, though some cards will specifically state they destroy Locations. If a Location is destroyed, turn it over and leave it where it is. It still counts for movement for Characters, but not for Disasters. Characters cannot stop on a destroyed Location.
Scavenging Locations, defeating some Disasters, using some Equipment, etc., may list skills that are required in order to Scavenge, Defeat, use Equipment, etc. Here's how to read the skill requirements:
Both of the listed skills must be present to Scavenge. If for example, it lists "Cooking & Acrobatics," you would need a Character with both the "Cooking" skill and the "Acrobatics" skill, or two Characters, one with the "Cooking" skill and the other with the "Acrobatics" skill to be able to Scavenge the restaurant.
One of the listed skills must be present to Scavenge. Example: Ballpark lists "Streetwise or Non-flying Vehicle." Any Character with either the "Streetwise" skill or a Non-flying Vehicle (such as Yajirobe's Hog) would enable your group to Scavenge the Location.
Skill must be present "X" times to Scavenge. Example: Desert Battleground lists "Flying x2." Tien and Baba, both listing "Flying" skill, could enter together. Without Baba, Tien could enter, for example, with the Airbus (gives Flying skill).
Your group can Scavenge if they have either skills 1 and 2, skill 3, or skills 1, 4 and 5. The "or" is key.
A Character which lists "Skill -1" cancels that skill in one Character (of the same player) at the same Location, or reduces the total skill levels present by one.
[Very rare] At least 1 Character in any group attempting to Scavenge must have the listed skill, and at least 1 Character in the group must have an Attack ability of at least "X". Example: Genom Tower lists "Strength 4+". Ryoga Hibiki, with the "Strength" skill and Attack 3, and Mr. Panda with Attack = 4 could Scavenge the Tower together. Ryoko, with "Strength" skill and Attack = 4, could Scavenge the Tower alone.
There are three kinds of vehicles: Non-Flying, Flying and Planetary. A vehicle card cannot carry another vehicle card unless the card states it can. Destruction of a vehicle does not damage its occupants, nor their Items and Equipment.
If a vehicle has Damage and Defense abilities, it may be used in Combat. If a Vehicle is in Combat with an opponent, no other Characters may attack that opponent until that vehicle ceases Combat. The damage done by the opponent is done to the vehicle. If the vehicle takes its Defense in Damage, it is discarded. Vehicles do not regenerate their Defense after a Combat. They must be repaired using Flash Effect cards that repair damaged Equipment cards.
Many cards have one or more Categories listed between brackets at the bottom of the text box «Category, Category». (Set 0 lacked these.) When a card states it affects a certain kind of card, took for a matching Category. (E.g., This card allows you to Scavenge any "Hot Tub" Location—look for «Hot Tub» at the bottom of any Location card.)
If a card has a « Unique » category, it means the same as when a card says, "Limit 1 per deck."
If a Disaster has a « Horde » category, every like Disaster in play gets +1 to its Attack and Defense. (E.g., if you have an Alien Invasion Force and a Bugrom Horde in play at the same time, they do not give each other any bonuses. However, if you have a Bugrom Horde and a Bugrom Type 1, the Type 1 would get +1 to its Attack and Defense. Two Bugrom Hordes in play at the same time, would each get +1 to Attack and Defense. If you had two Bugrom Hordes and a Type 1, the Hordes would gain 1 each and the Type l would gain 2 on its Attack and Defense.
Some Character cards have two sets of abilities and a smaller picture in the bottom right corner of the main picture. If you are using the primary form of the card, use the abilities listed on the left. If you have the alternate card (i.e., if you have Washu on the Field and you have Little Washu in your hand or Haven), you can bring Little Washu into play and take out Washu. You would use the left (primary) abilities for Little Washu.
Saiyans only transform into their were-form as a result of a Full Moon. Super-Saiyans may only come into the game when the card's conditions are met.
A Character that is transforming cannot be moved that turn except by a Disaster. If a Transforming Character is forced to transform, and you don't have the alternate card, you can use the alternate-form abilities, which are listed on the right side of the ability buttons, but you cannot use any of the Character's skills. Also, you will not be able to transform back without a card that transforms you. You cannot have both forms of a transforming Character in play at the same time.
Some Disasters state they "steal" a card (usually an Item) from Characters. Some Power cards also let you "steal" cards from Disasters and/or other Characters. Note: Characters with the "Pure Heart" skill will never attempt to steal.
A Character or Disaster attempting to steal a card must be at the same Location as the Character or Disaster with the card to be stolen. The "stealer" (a single Character or Disaster, never a group of Characters) may take the card and get 1 full movement before anyone can attack. (E.g., the Najato Disaster, with a move of 3, is 1 to 3 Locations away from you. During its next Disaster phase, it will move through or land on your Location. If you have one or more Items, it will steal a random Item from you and then move 3 more Locations before the end of its Disaster phase. You may pursue it during your Move phase and take the Item back, if you can catch it and defeat it. If Najato already has an Item, that Item will drop under the Location where Najato steals the Item from your Character.)
If you draw Najato during a Scavenge attempt, it will take an Item and move 3 Locations before anything else is done. You may continue Scavenging but you can't pursue Najato because you have no Movement left once you start Scavenging a Location.
Characters may steal Items from other Characters in the same manner. The stealer takes the Item and gets a full move before anyone, except Disasters, can attack it. (E.g., your Dr. Tofu moves (during Move phase) through Washu's Lab. Rokkon is there with an Item. You play a Sticky Fingers Flash Effect that allows you to steal 1 Item. Pick a random Item (the Fingers don't let you make the other player reveal what Items the Character has). Dr. Tofu gets his full move again before he can be pursued.)
It after stealing an Item, you move to a Location where there is a Combat Disaster, the Disaster will try to take the Item from you, as in normal play.
Characters may steal Items from Disasters. However, if a stealing Character already had an Item, it won't get a move after stealing because the Disaster would automatically attack (see Maintenance Phase) for the Item the Character had when it stopped to steal.
Random luck in the game is handled in two ways. For Combat, Combat Cards are used. For other situations, a card may say you succeed if you win at Rock/Scissors/Paper (1:2 chance to win). You can also flip a coin, roll a die, etc., to determine who wins a 1:2 chance. A card might also indicate a 1:3 chance to succeed/win: play Rock/Scissors/Paper once; if you both have the same (i.e., Rock and Rock), success. Or, you can roll a six-sided die. Please, Dwarf Tossing is not an approved method.
Rather than playing until all of the Items are gone, play until only 5 or 3 Items are left, for example.
If players agree, feel free to proportionately increase the number of Power Cards, etc., in your Draw deck. You can also allow more than one of the same card (except for cards stating Unique or Limit 1 per deck.)
If a player can keep a group at a Location for two turns, on the third turn they succeed at by-passing the Scavenging requirements for that Location. (They still have to deal with any Disasters present.)
During Game Setup, you can place your Items beneath any Location card. Still, only 1 Item is placed beneath each Location.
For tournament play with pre-built decks, more specific numbers for each card type will be enforced.
7 Locations per player. You may only have 1 of any particular Location card.
You must start with 11 Items per player. No more than 2 of any particular Item card per player.
You may still have any number of Characters, but only 1 of any particular Character per player. You may only have 6 Characters in play at any one time.
You may have any number of Combat cards, but no more than 3 of any particular Combat card.
You may have any number of Power cards (Enhancement, Equipment, Flash Effect, and Global), but no more than 3 of any particular Power card in your deck. You must also use a correspondingly larger number of Disasters in your Draw pile.
You may have no more than 3 of any particular Disaster in your deck. At least 1/2 of your Disasters must be Combat Disasters. At least 1/2 of your Combat Disasters must be Major Disasters.
| Starting Characters | 4 |
| Haven | 1 |
| Locations | 7 |
| Items | 11 (7 will be used) |
| Power & Add'l Characters | 20 (minimum) |
| Non-Combat Disasters | 10 |
| Combat Disasters, Minor | 5 |
| Combat Disasters, Major | 5 |
| Combat | 11 (minimum) |
| Draw Deck | (26) |
He can be Bonked or Killed.
This is a Magnet Disaster ("All Disasters in play immediately move to this Location"). All cards of that type with a Movement ability must move immediately to the Location the Disaster lands on, no matter how far away they are. Cards that are Off the Field are not affected.
See the P-Anime website or call for a full explanation of this and other Ally Disasters.
If in ship form, he can't use Equipment (he keeps them, though).
Limit 1 use per turn, use affects entire Group.
Limit 3 uses and can't be used on itself. Cannot be used to go to a Haven.
Change "Lowers Motion" to "Reduces Movement"
You must have the Master Key card to Equip Tsunami.
Change "Destroy" to "Discard"
Characters inside ships cannot use their special abilities (i.e., Alielle can't prevent other Characters from being attacked).
Equipment cards in Sets 0 and 1 have a brown rather than a Power card blue face border color. A compete errata List can be found at the p-anime website.
On a few cards, the Medical skill is actually the Medic skill.
If you have difficulty in keeping some of your cards from getting mixed up with other player's cards (primarily Items and Disasters and to a Lesser degree, Locations), don't fret. Here are a few tips on how to keep track of your cards.
This is an alternate method for setting up your playing Field (except for 2 player games). It is also much easier to keep track of your cards. In this lay-out, you set up your Locations in straight lines, which you can daisy chain together to include as many players as you wish.
Setup is the same except for the following: Place your Locations face up in a Line, in any order you choose. Try to place Locations at the edges of your Field that are as difficult as possible to Scavenge for anyone except your Characters. Place your Haven adjacent to any of your Locations.
Ani-Mayhem created by AnimeCafe, Inc. Sets 0 & 1 created by AnimeCafe (Jon Healy, Keith Pinster, & Josh Ritter).
Ani-Mayhem Dragon Ball Z created by Jack B. Everitt of Silver Island with Tod Harrick of Pioneer. Produced by Tod Harrick. Dragon Ball Z rulebook edited and revised by Jack B. Everitt.
Pioneer and Silver Island would like to thank their Dragon Ball Z play testers: Scott Peterson, Robert Jury, Stephen Tang, John Adams, Philiip Cadieux, Geoffrey Horn, David Arritoa, Chester Knurek, Alex Mungia, Lance Hildebrand, Josh MacLaughlin and Patrick Araket.
Thanks to Stephen Tang for a great home page.
Pioneer Entertainment Animation Division: Hideki Goto, Tod Harrick, Hiroe Tsukamoto, Yuji Moriya and Kevin Chu. With eternal thanks to Naoju Nakamura.
Thanks to FUNimation, especially: Bob Brennan (Licensing) for taking the call in the first place, Gen & Cindy Fukunaga (President & V.R) for agreeing, and Moses Varga at FUNimation studios for 3 frighteningly long days of screen capturing. Thanks to Mary Jo Winchester and Yasuo Matsuo at Cloverway Inc. Eternal thanks to Sasaki at TOEI ANIMATION for understanding and efficient approvals.
Ani-Mayhem product support coordinated by Pamela Mosby of MTweveEnterprises.
Pioneer would also like to thank: Anime Crash for names, Joanne White at Scrye magazine for ongoing advice and good judgment, Kathleen Heydon for legal advice, Ernie Chapa and John Faries at Upper Deck and Rika Davis at Bandai Entertainment.
DBZ Package Design by Kim Battles and Millie Kinsey.
Manufactured by The Upper Deck Co. (Carlsbad, CA)
Ani-Mayhem™ and © 1996 Pioneer Entertainment (USA) L.P. Ani-Mayhem is a registered trademark.
Dragon Ball Z © 1997 BIRD STUDIO/SHUFISHA, TOEI ANIMATION. Licensed by FUNimation Productions, Inc. All Rights Reserved. Dragon Ball Z and all logos, Character names and distinctive likenesses thereof are trademarks of TOEI ANIMATION.
Call our toll-free customer service number:
1-800-421-1621
Or write to us at:
Ani-Mayhem
C/o Pioneer Entertainment
2265 E. 220th St.
Long Beach, CA 90810
©Copyright 1997 by Pioneer Entertainment. All Rights Reserved.
Akira Toriyamo is often referred to as the successor to Osamu Tezuka (the "father" of Japanese animation). Hailed for his "edgy" drawings, unique battle movements and his ability to create strong stories which embody hope for the future, Toriyama is the only manga artist whose work has been displayed at Tokyo's National Museum of Western Art.
Dragon Ball Z began as a manga series titled just Dragon Ball in the hugely popular Japanese weekly manga magazine Shoten Jump. Dragon Ball followed the adventures of Goku, a boy with a pure heart, a tail and incredible strength who had been raised in the wilderness by a legendary martial arts master.
In 1986, Dragon Ball was turned into an animated series. After two years, the animation company, TOEI, decided to skip some of Goku's adolescent adventures. They renamed the series Dragon Ball Z and moved forward in the story to when Goku is a man and has married and had his first child, Gohan, which is where Ani-Mayhem also picks up the storyline.
YEAR 1: starts by dealing with the mystery of Goku's origins is dealt with. A powerful invader from outer space arrives. His name is Raditz, and he claims he is Goku's brother. Both he and Goku, he says, are Saiyans, incredibly powerful warriors from the planet Vegeta. Goku was originally sent to Earth as a baby to conquer it, but a memory-erasing head injury prevented this. Now Raditz expects Goku to finish the job, or else. Goku teams up with his greatest enemy, the demonic Piccolo to battle Raditz. In the end, Goku sacrifices his own life to defeat Raditz. But passing on, Raditz reveals two other Saiyans, far more powerful than him, are also on their way to Earth.
The rest of the 1st year of Dragon Ball Z deals with a search for the 7 Dragon Balls with which to wish Goku back to life so he can face the two new Saiyans, Goku's quest to train under the godly King Kai, Piccolo's harsh training of Goku's son, Gohan, and the eventual battle with the two Saiyans, Nappa and Vegeta. Vegeta is a truly horrible foe, who will become Goku's nemesis throughout the Dragon Ball Z series. The two Saiyans are eventually defeated by Goku, but only after killing most of Goku's friends, including the evil Piccolo, who finds grace of a sort by sacrificing himself to save Gohan. Further, it turns out Piccolo was connected to the Dragon Balls. With his death, they have disappeared, so none of the allies can be wished back to Life.
YEAR 2: deals with a quest to Piccolo's home planet of Namek in an effort to obtain another set of Dragon Balls with which to wish Piccolo and the other allies back. Goku is too injured to go, but Gohan, Goku's best friend Krillin, and the intrepid if difficult Bulma agree. The journey is long and fraught with dangers, but eventually they make it to Namek, only to find the minions of the truly vile Emperor Freeza. Freeza, a kind of "poor little rich monster", whose hobby is destroying planets, is also after Dragon Balls, hoping to wish for immortality.
Goku, nearly healed, learns of Freeza and sets off for Namek in a special spaceship, that Lets him work out at up to 100 g's, becoming incredibly strong. King Kai warns that Freeza is too powerful for anyone to beat, and angering him may endanger the universe itself but Goku is determined to help his friends. Vegeta, however, has also healed, stronger than ever, and is also headed for Namek with lust for the Dragon Balls and hatred for Goku in his black heart.
YEAR 3: is a non-stop battle royal between the minions of Freeza, the ever more powerful Vegeta, and the now equally powerful Goku. Most of Namek is destroyed in the epic fight, and Goku finally transforms into a Super-Saiyan, a super-powered version of himself with blond hair, green eyes and a blazing energy aura.
This is where Ani-Mayhem leaves off in the series. We have also used 3 of the 13 Dragon Ball Z movies, featuring the villains Garlic, Jr., Dr Weelo and Tares. Look for all these Dragon ball Z videos from Pioneer.
If you want to see more Dragon Ball Z in future Ani-Mayhem sets, please contact Pioneer and Toei.
Disaster or Characters initiating Combat declare who they are attacking.
Defending Characters declare who they are counter-striking against.
Any Characters not attacking or counter-striking decide if and who they are protecting.
The Disaster and Characters being attacked draw Combat cards.
Calculate attacker's total Attack, Subtract defender's Defense. Remainder is the Damage done to the defender's Health.
Repeat steps 1-5 until either: Disaster is Defeated (its Health is below 0), all Characters on one side are Defeated, or a Character-side runs away.
Group arrives at Location.
Defeat face up Disasters.
Pass Location's skills test.
Turn up first Disaster.
Non-Combat takes affect automatically.
Combat a Combat Disaster.
Repeat step 4 until there are no more Disasters at the Location. Then take Items and Equipment.
(skip at the start of the game)
You may discard any card in your hand or Characters of yours in a Haven,
Draw until you have 7 cards in your hand or until you draw a Disaster that can affect the Field.
Move Disasters. Update Disaster time for Disasters with time limits.
You may do any or all of the following—
Play 1 Equipment into your Haven.
Play 1 Enhancement on a Character.
Play 1 Global Effect off the Field.
Place Characters from hand and/or Bonked Characters (who have sat out at least a full turn) at your Haven.
Move any Characters up to the limit of their Movement ability.
Attempt to Scavenge a Location if all skills required are available.