
Bubblegum Crisis, El Hazard, Ranma 1/2 and Tenchi Muyo!
Bubblegum Crisis, El Hazard, Ranma 1/2 and Tenchi Muyo!
Dragon Ball Z
 Enhancement
 Flash Effect
 Equipment
 Global
 Combat
 Major
Major
 Minor
Minor
 Dimensional
 Planetary
 Science
 Haven
Haven
 Male
Male
 Female
 Attack
 Defense
 Move
Move
 Charm
Charm
 Energy
If you are familiar with Japanese animation, you know you're in for a treat. If not, you are about to be introduced to a stunning art form. Ani-Mayhem was created and produced with love for "Anime" (so-called in Japan and by its fans around the world), We've made the things that drew us to Anime part of Ani-Mayhem. Manic hunts through its scrambled worlds give a taste of Anime's magic and incredible variety. Each new game will plunge you into an Aniverse of your own creation. We hope you have as much fun playing Ani-Mayhem as we had creating it.
You will construct a "Field" using special "Location" cards. Under the Locations cards, you will hide "Item" cards and "Disaster" cards. Using teams of Character cards, you will retrieve as many Item as you can. Special "Power" cards can be used to strengthen Characters. But "Disaster" cards will try to stop you by stealing or destroying Items from your Characters, or by fighting the Characters. When playing with other people, each player will use his or her own deck of Characters and Power cards (which you can custom build from any of the three Ani-Mayhem sets now available: Ani-Mayhem Set 0, Ani-Mayhem Set 1 or Ani-Mayhem - Dragon Ball Z). You will play on a Field made up of the Locations and Items belonging to all of the players in the game. You will also be fighting against the Disasters belonging to all of the players in the game. When more than half the Items are gone, the game is over. If the player or players retrieve half or more, the player with the most number of Items wins. If the Disasters retrieve more than half the Items, the game wins. That is why Ani-Mayhem is the first collectable card game to work with many players, or which you can play solitaire -- because your real enemies are the Disasters. It is also why in Ani-Mayhem, it is important to know when to team up with your opponents against the Disasters you both are fighting…and when to stop.
…are for general game play. If there is a conflict with any card, the card will take precedence.
…you will encounter throughout this rulebook and Ani-Mayhem. If you wish, you may skip directly to the "Card Descriptions" section, and refer to these definitions only when necessary.
The sum total of all the Damage abilities (see Symbol Descriptions), including all bonuses of all Character or Disasters attacking a single target is called an Attack.
A Character is Bonked when its Health (see Health) is reduced to 0 or below (see Combat). The Character must be removed from play for 1 complete turn of the owning player. No one can attack a Character while it is out of play. After a Bonked Character has been out of play for one of your turns, you may place it back in your hand during your Reload phase. Once back in your hand, it is healed completely.
Most cards have 1 or more Categories listed between brackets at the bottom of the text box (« Category, Category »).
When a card states it affects a certain kind of card, look for a matching Category (e.g. "This card allows you to Scavenge any 'Hot Tub' Location -- look for « Hot Tub » at the bottom of any Location card).
Other Rules: Look for info on Unique and Horde Categories.
Disasters are not Bonked. When a Disaster's Health is reduced to or below 0, it is Defeated. Discard defeated Disasters.
Remove a card from play for the remainder of the game.
Remove a card from play and place it in the owning player's Discard pile.
A Character or Disaster's Health is equal to its basic Defense Ability. Bonuses to Defense (i.e. from Power cards, Combat cards, etc., do not increase Health). Damage to Health is accrued during combat. After combat ends, the Health is restored immediately to full.
All Locations together (no Havens).
All cards that in any way affect the Field. Bonked Caracters, cards in a player's hand, and cards in a player's Draw and Discard Piles are not "in play".
If a Character is attacked with 3 times its Health in a single combat round, it is Killed and must be discarded.
The maximum number of Locations a card can move each Turn (see Time Passages) is indicated by its Movement ability (see Symbol Description). A Character can move up to its Movement ability. Moving from 1 Location to another takes 1 point of Movement. Moving a Character to or from a Haven to a Location takes 1 point. Moving a Character from a player's hand to a Haven takes no Movement. Moving a Disaster from the Draw pile to a Location takes no Movement. Moving a Disaster from a Location off the Field takes 1 point of Movement.
A card that is played not on any Locations. Globals are played Off the Field. Some Disaster state they are played Off the Field. These cards are still "in play".
Characters and Location cards both list "Skills". The Skills listed on the cards of a Character or group of Characters must match the Skills listed on a Location for Character(s) to enter and Scavenge the Location for Items.
Other Rules: Look for info on different kinds of Skill Listings.
The time is takes for a Disaster to make its way from where it starts on the Field to where it exits the Field.
The ammount of time a card stays in play for the player that plays it. (Example: Alan draws a Disaster that lasts 2 turns. That card stays in play through the end of the turn he drew and played it, then through the end of his next turn. It is then discarded.)
The time it takes for Characters and Disasters to each get one attack during Combat. There is no limit to the number of rounds there can be in each turn.
The time it takes for a player to go through all his phases.
have purple fronts. They have 5 "Abilities" listed in buttons on the lower left of the card, and 2 text boxes. The top text box (Skills Box) lists the Skills the Character possesses. The bottom box (Text Box) has information about the card. Character Abilities are Attack, Defense, Movement, Charm and Energy. Most Characters are either male or female (see Symbol Descriptions).
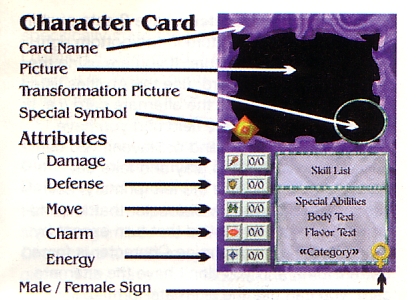
have 2 sets of abilities, and a smaller picture in the bottom right corner of the main picture. If you are using the primary form of the card, use the Abilities listed on the left. If you have the alternate card (e.g. if you have Washu on the Field and you have Little Washu in your hand or Haven), you can bring Little Washu into play and take out Washu. You would use the left (primary) abilities for Little Washu. A Character that is transforming can not be moved that turn except by a Disaster. If a Transforming Character is forced to transform, and you don't have the alternate card, you can use the alternate-form abilities, which are listed on the right side of the ability buttons, but you can not use any of the Character's Skills. You also will not be able to transform back without a card that transforms you. You cannot have both forms of a transforming Character in play at the same time.
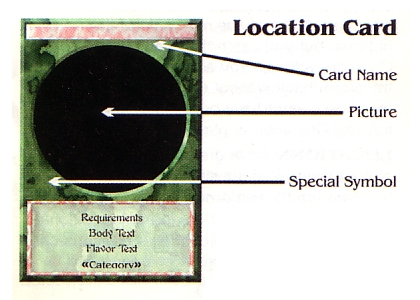
have green fronts, a circular picture window and a single text box. The Text box lists the Skills a group of Characters need to Scavenge that Location and any additional information about the Location. Locations can not be discarded, though some cards will specifically state they destroy Locations. If a Location is destroyed, turn it over and leave it where it is. It still counts for Movement for Characters, but not for Disasters. Characters cannot stop on a Destroyed Location.
Other Rules: Look for info on Planetary and Dimensional Locations, Locations with Defense, and Locations with Attack.
are special Locations you use to start the game or store Equipment, extra Characters, and Items you pick up during the game. They have an octagonal picture window, a castle symbol in the bottom left of the picture window, and no requirements in the Text Box. That's because you can Scavenge a Haven.
You have complete control over who gets to enter your Haven, Another play may move his/her Character(s) over your Haven without asking you, but may not stop there without asking your permission. If you do allow another player to stop at your Haven, that player has free access to it and may take out any Item(s) and/or Equipment there. If you have Characters there, you can Combat that player's Characters (see Combat) if they try to take something you don't want them to take, but if you have no Characters there, they can take whatever is there. They also don't have to leave until they want to or you force them out. So be careful who you allow into your Haven.
have tan fronts and the name of the Item running up the left side of the card. The single text box has information about the card. Only cards that say "Item:" are Items. Pieces of Equipment are not Items.
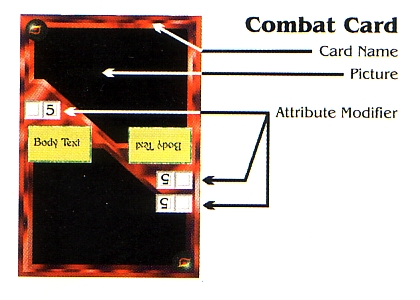
have red fronts. They are played during either Charm or Physical Combat. One side of the card give a Charm Combat modifier. The other side gives a Physical Combat modifier. Your Combat cards are played for your Characters and Disasters your Characters are in Combat with. They are meant to create a random element in the Combat system. Play Power cards for actual enhancements to your Damage, Defense, and Charm abilities.
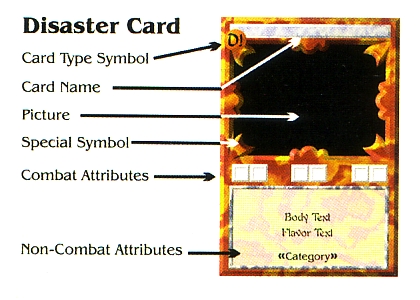
There are two types: "Minor"
and "Major"
.
They may have any combination of abilities or none at all.
The difference between Major and Minor Disasters is persistence, not nastiness (see Maintenance).
Disasters that have Damage and Defense abilities are "Combat" Disasters. As a general rule, only Combat Disasters actually pick up Items and try to carry them Off the Field.

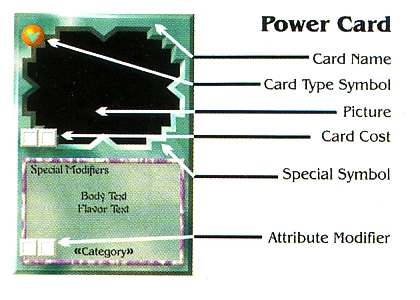
Requirements to use a Power card or Limits on the its use will be stated in the Text box of the card. Requirements can be Skills or Categories a Character must have.
Any Cost to use a Power card is shown in a button with an ability symbol and number in the botton left of the picture window. Most Power card costs are Energy Costs which must be paid each time the card is used. During Combat, Characters regain 1 point of energy per Combat round. All Energy a Character expends to use Power cards is restored at the end of Combat or of the player's turn.
Power card Ability Modifiers preceded by a mathematical symbol (i.e. add (+), subtract (-), multiply (x), or divide(/)), alter the ability levels of the Character possessing the Power card. Modifiers with no mathematical symbol replace Ability levels.
give Characters special skills or abilities.
Once played on a Character, they can never be transferred to another Character and are only removed if the Character is Killed or Bonked or by a card that specifically removes an Enhancement.
may have any combination of ability modifiers.
The text box may list skills the card bestows on a Character as long as it carries the Equipment.
A Character cannot use 2 Equipment cards that give bonuses to the same ability (i.e. If you are using a gun that gives +3 to damage and you get a Hardsuit that gives +1 to damage & defense, you may not use the Hardsuit, even to gain the defense bonus, until you stop using the gun. If you get a shield that gives +1 to defense, you may use it with the gun because the shield gives no damage bonus).
When you play a Global, play it on the side of the Field.
It affects all of your Characters that are on the Field.
If there is no other limiter on a Global (i.e number of uses or time limit), Globals stay in play up to a maximum of 5 turns.
can be played at any time during the game except during your Reload phase.
Once a Flash Effect is played, it takes effect and then is discarded.
If a Flash Effect has a cost, a Character at the Location where the Flash Effect takes effect must be able to bear the cost.
You can have practically any number of cards in your deck in any combination of specific cards you wish, but you must have certain numbers of each type of card, depending on the number of players in your game.
| Players | 1 | 2 | 3 | 5 |
| Locations | 9 | 7 | 5 | 4 |
Only 1 of any particular Location in your deck.
You may have any number of Havens, but only 1 of any particular haven in your deck.
1 Item/Location. No more than 3 of any particular Item in your deck.
You may have any number of Combat cards, with no limit to duplications. We suggest you use every combat card you can get your hands on. It leads to a more interesting game and more great Anime images.
You may have any number of Characters, but only 1 of any particular Character in your deck. You may only have 6 Characters in play at any one time.
You may have any number of Power cards (Enhancement, Equipment, Flash Effect, and Global), but no more than 3 of any particular Power card in your deck.
You may have no more than 3 of any particular Disaster in your deck.
The number of Disasters in your deck depends on the number of Locations you are playing with (which in turn is related to the number of players in your game) and on the number of Power Cards and extra Characters you use.
Note: 1/2 of your Disasters must be Combat. 1/3 of your Disasters must be Major.
Examples: Here are some sample 60-card deck breakdowns. Of course, you can use as many Power cards and extra Characters and Havens as you like, but you must use a correspondingly larger number of Disasters in your Draw pile.
| Players | 1 | 2 | 3 | 5 |
| Set-Up Cards | ||||
| Locations | 9 | 7 | 5 | 4 |
| Haven | 1 | 1 | 1 | 1 |
| Items (1/Location) | 9 | 7 | 5 | 4 |
| Location Disasters (2/Loc.) | 18 | 14 | 10 | 8 |
| Draw Cards | ||||
| Starting Characters (choose) | 4 | 4 | 4 | 4 |
| Power Cards & Extra Char's | 14 | 20 | 26 | 32 |
| Sub-Total | 18 | 24 | 30 | 36 |
| Disasters | ||||
| 1/2 (base # of Disasters) = | 9 | 12 | 15 | 18 |
| -2 Disasters per player = | -2 | -4 | -6 | -10 |
| Total Draw Disasters | 7 | 8 | 9 | 8 |
| Total Draw pile Cards | 25 | 32 | 39 | 44 |
| Total Cards in Deck | 62 | 61 | 60 | 61 |
| Total Minor Disasters | 18 | 14 | 12 | 6 |
| Total Major Disasters | 9 | 8 | 7 | 10 |
(Remember, 1/3 of your Disasters must be Combat)
Other Rules: Look for info on an alternate, simple Lines layout.
Shuffle and set aside your Combat cards.
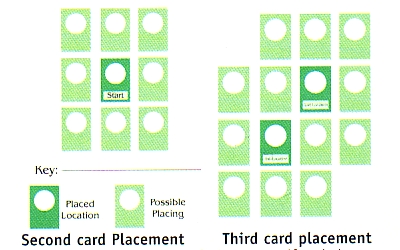
Shuffle your Location cards. Each play in turn will draw a Location card and place it on the Field face up. The 1st Location may be placed anywhere on the Field.
The 2nd Location can be placed on the Field anywhere next to the 1st. The rest are placed anywhere next to any card on the Field.
Place your Locations facing your oppenent to keep track of whose Locations are whose.
Place your Haven adjacent to any Location any time during Field building. If you have no Havens, you can use an extra Location card, but your get no benefit from it (ignore Skills, Defense & Attack, etc.). Mark it so everyone remembers it is your Haven.
Shuffle your Items. Place 1 under any Location on the Field. No peeking! Take turns placing one Item under Each Location. Don't place more than 1 Item under any Location.
Shuffle your Disaster cards. Take turns placing 2 Disasters at a time face down under each Location on the Field. Again, no peeking. No more than 2 Disasters under any Location.
Place up to 4 Characters in your Haven.
Take all your Power cards, extra Characters and extra Havens and shuffle them. This is your Draw Pile. Draw 7 cards. This is your begining hand.
Shuffle your remaining Disasters into your Draw pile.
Note: It is easier to keep track of your cards if you keep your Characters, Power cards and Items Off the Field and use tokens or chits to represent Characters in play.
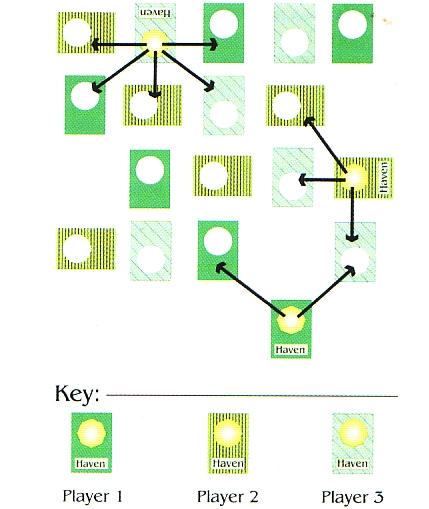
This page shows which Locations a Character may move to from a Haven on to the Field. Characters may move the same way from Location to Location. Locations are laid out to keep track of which player owns any particular Location.`
You may discard any cards in your hand and/or any of your Characters in your Haven.
Draw 1 card at a time from your Draw pile until you have 7 cards in your hand or you draw a Disaster. If you draw a Disaster that can affect the Field (including Disasters that play "Off the Field"), move to Maintenance phase immediately. If your draw a Disaster that can't affect the Field (i.e. if you draw Have a Nice Trip and there are no Characters on the Field that have a hardsuit or mecha), simply discard in and continue to draw cards. If you run out of cards, reshuffle your dicard pile.
Disasters capable of movement move a number of Locations equal to their Movement ability.
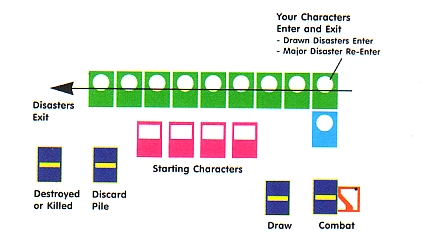
If you draw a Disaster from your Draw pile during the Reload Phase, it enters the Field at the top Location of the column to your right. It moves down that column counting 1 Location per movement point. When it gets to the bottom, it goes straight to the top of the nect column to the left. It will then move down that column 1 card at a time and so on.
When it gets to the bottom Location ins the last column to your left, it moves Off the Field. This is the end of its cycle. Minor Disasters are discarded. Any Items they carry are Destroyed. Major Disasters Destroy the Items, then re-enter the Field at the top of the column to your right and start all over again.
Disasters with Movement move their full movement capability each Maintenance phase. Move the Disaster closest to moving Off the Field first, then then next closest and so on.
Only COmbat Disasters pick up items. A Disaster will pick up an Items from the first Location it lands on where there is an item.
If a Combat Disaster lands on a Location where there are Characters, or vice versa, the Disaster will automatically attack a random Character carrying an Item each Combat round. If no Characters at the Location have Items, the Disaster will attack a random Character each Combat round.
If a Combat Disater moves past a Location where there is a Character with any Items, the Disaster will drop its Item under the Location they are both at and automatically attack the Character, trying to take the Character's Item
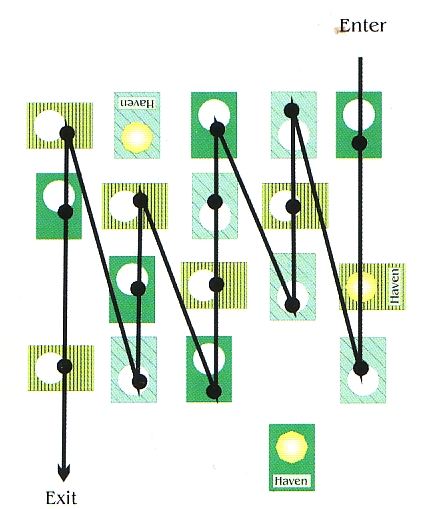
This shows how Disaster move on the Field. Each large dot on a Location along the path is counted for Movement. Once is reaches the arrow head at "EXIT", it is at the end of its cycle. Notice that Disasters don't count Havens during their movement.
away (see Combat). If the Character doesn't have any Items, the Character may attack the Disaster and try to defeat it. If the Character defeats the Disaster, the Item the Disaster had been carrying drops beneath the Location they are at. Disaster only carry 1 Item at a time.
If you enter Combat with a Disaster that has a Charm ability, it will automatically charm attack first (see Charm Combat).
When a Non-Combat Disaster completes the action described in the text box, it is discarded.
Other Rules: Look for info on Non-Moving, "Moves Once", Magnet and Ally Disasters.
You may play any Characters in your hand into your Haven. You may have any number of Characters in your Havens but no more than 6 on the Field at any one time.
You may play up to 1 each Enhancement, Equipment and/or Global Effect. Play Enhancements and Equipment on any Character in your Haven. Play Globals Off the Field. Global bonuses affect all of your Characters.
Other Rules: Look for info on Extra Havens.
Your Characters enter the playing Field from your Haven to any adjacent Location. You may move in any direction, but a group of Characters is limited to the Movement of the slowest Character.
Perform a skills test. Compare the skills listed on the Location to the skills listed in the text boxes of the Characters you have at the Location. If your Characters have the skills listed on the Location they are at, they can attempt to Scavenge that Location.
Example: Mr. Panda, P-Chan and Miz Mishtal are at the Desert of Bleached White Bones.
| Character | Skills |
|---|---|
| Mr. Panda | Survival, Climbing |
| P-Chan | Survival, Blind Luck |
| Miz Mishtal | Priest, Bureaucracy, Water Element |
| Location | Skills |
|---|---|
|
Desert of Bleached White Bones |
Survival & Flying or Water Element |
While Mr. Panda and P-Chan have Survival, no one has Flying. Fortunately, Desert of Bleached White Bones requires "Survival & Flying" OR "Water Element", and Miz has "Water Element", so the entire group passes the test. All 3 can enter and Scavenge.
Other Rules: Look for info on Skill Listings.
To begin Scavenging, turn over one of the Disasters underneath the Location.
If it is a Non-Combat Disaster, you must meet or overcome its requirements (although a few Non-Combat Disasters will take effect without directly hindering a Character's progress).
If it is a Combat Disaster you will have to Combat it to Defeat it (see Combat). You can Run Away now if you want, the the Disaster will get to Attack you once unanswered (see Combat - Running Away).
If you Defeat the Disaster, Discard it. You may continue to Scavenge now by turning over the next Disaster that is under the Location.
If you Defeat all the Disasters at a Location, you may retrieve all other cards at the Location (Items, Equipment, etc.). Assign them to one or more of the Characters at the Location as you wish. Any Equipment can be used immediately.
All Attacks and Defense are simultaneous, but we say cards initiating an attack are "attacking" and cards being attacked are "counter-striking". A counter-strike is still an attack. Attack and counter-strike happen in the same Combat round.
Up to 3 Charactes can attack a Minor Disaster each Combat round. Up to 4 Charactes can attack a Major Disaster. Up to 3 Charactes can attack another Character.
In Physical Combat between Characters and Disasters, the Disaster initiates Combat every round. Draw 1 Combat card from your Combat pile for the Disaster and another for any Characters being attacked, in that order.
In Physical Combat between Characters, each player uses his or her own Combat cards for his or her Characters.
Add all ther attackers' total Attack abilities, including bonuses. Subtract the defender's total Defense. Anything left is the Damage the defender takes to its Health. If a Character's Health falls below 0 in any Combat round, it is Bonked (see Basic Terms). If a Characters takes 3x its Health (e.g. a Character with 3 Health is hit with an attack of 9) in a single Combat round, it is Killed. Discard it. Combat continues until all Characters are Bonked or Killed, a Disaster is Defeated, or one side Runs Away.
Damage to Health is cumulative each round for the duration of that Combat only. After the Combat is over, Health is restored to full for all Characters and Disasters remaining in play.
If you want to Run Away from a Combat, just state you are doing so at the beginning of any Combat round. Any Characters or Disasters you are in Combat with get a final attack, Your Characters do not get to counter-strike. Move any Characters you have left 1 Location (you can't Scavenge that Location this turn).
Disasters do not Run Away unless they specifically state so on the card. Characters do not get a last attack on a Disaster that Runs Away.
In Combat bewteen Characters only, up to 2 Characters may protect another Character. The Defense ability (including bonuses) of the protecting Characters is added to that of the Character being protected. Protecting Characters can perform no other actions during that Combat round except Defense. Protecting Characters take half Damage (round up) from any attacks against the Character being protected. Protecting Characters take a minimum of 1 point of Damage per Combat round, regardless of the level of attack.
Example: Mr. Panda (Defense = 3), protects Kiriya (Defense = 3). Now Kiriya's Defense = 6 for that Combat round. If Mr. Panda is wearing Nene's Hardsuit (+1 Defense) and Kiriya has Linna's Hardsuit (also +1 Defense), Kiriya's Defense = 8 for that Combat round.
The attack on Kiriya = 10. She takes 2 points of Damage to her Health (10 - 8 = 2). Mr. Panda takes 1 point of Damage to his Health. Kiriya may counter-strike this round, but Mr. Panda may not.
Kiriya is attacked again. Mr. Panda continues protecting. The attack on Kiriya = 1. She takes 0 points of Damage to her Health (10 - 8 = 2). Despite the low level of the attack, Mr. Panda still automatically takes 1 point of Damage to his Health. Mr. Panda decides he's had enough, and decides to attack Kiriya.
Characters may Charm Combat other Characters or Disasters with Charm. If Characters enter Combat with a Combat Disaster with Charm, the Disaster will automatically initiate Charm Combat first.
If you lose Charm Combat against a Disaster, that Character may not attack the Disaster until the Disaster attacks that Character.
If you win Charm Combat against a Minor Disaster, you may make it perform 1 legal action (e.g. hand over an Item, Move (up to its maximum) in any direction, do not defend for 1 round, do not attack for 1 round, attack a Character or another Disaster for 1 round, etc.).
If you win against a Major Disaster, the Disaster will ignore that Character until that Character attacks the Disaster.
If all the Characters at a Location lose Charm Combat with a Disaster, the Disaster will take an Item from the Location if one is there and leave on the next turn. It will disregard the Characters if they do not attack it.
A Character may also charm attack any other Character at the same Location as that Character. A Character can be in Charm Combat any number of times in a given turn, but may only initiate once per turn. A Character cannot attempt to charm any other particular Character 2 turns in a row. Characters can not combine charm attacks.
Charm Comabt lasts 1 round. If the charming Character has a higer total Charm (inlcuding all bonuses) than the target, the charmer can make the target perform 1 legal action (e.g. attack another Character or Disaster for 1 Combat round, make a specific Move up to its maximum during its next Move phasem hand over an Item, etc.). Also, no other Character at that Location belonging to the player who owns the Charmed Character can attack the charming Character during the next turn.
If the charming Character loses, nothing happens, unless it loses by a number equal to its own base Charm. In that case, the charm backfires and the target gets to make the erstwhile charmer perform 1 legal action.
Any Character can break a charm by charm attacking a Charmed Character with twice the amount it was Charmed by, or by Defeating the charming Character in Charm Combat that round. (e.g.: Washu loses a Charm Combat with Dailey Wong by 2 points. Dr. Tofu charm attacks Washu again to break the charm. If Dr. Tofu wins by 4 or more points, the charm is broken and Washu continues as if nothing had happened. Alternately, if Dr. Tofu can Defeat Dailey in Charm Combat this round, the charm is also broken.).
If you find it a bit difficult to keep some of your cards from getting mixed up with other players' cards (primarilly Items and Disasters and to a lesser degree, Locations), don't fret. There are easy ways to keep track of your cards.
Always keep a list of all your cards you have in your deck. At the end of the game, you will have a check list you can go through.
You should be able to find little dot stickers in any office supply or stationary store. Put same colored stickers on the backs of cards that can get mixed up. If you don't want to mess up the cards (especially limited-run and rare cards), you can get protective sleeves for the cards and put the sticker on the sleeve or slip a piece of paper against the back of the card with your name, initials, or symbol on it. You usually don't need to do this for Characters, Flash Effects, Havens, Globals, or Combat cards. The only Enhancement or Equipment cards you will need to do this for are the ones you lose control over during a game (i.e. if a Disaster or another player's Character takes them).
Here are some basic scenarios covering Scavenging, Combat between Characters and Disasters, and Combat between Characters.
Tom is playing a team consisting of Little Washu, Nene Romanova, Ryo-Ohki (Cabbit), & P-Chan. P-Chan has a Clean Livin' Enhancement (+1 Attack, +1 Defense, -1 Charm). Nene has the Control Cube Equipment (gives Dimensional ability).
On their first Scavenging attempt they decide to go into the Hot Springs House. They have 3 Females (yes, the cabbit is female), so they can do it.
Tom turns over the 1st Disaster, a Bugrom, Type 1 (Minor Combat Disaster).
Since they encountered it during Scavenging, the Disaster automatically initiates Combat.
If he thinks the Bugrom is too powerful, Tom may opt to have his Characters Run Away. The Bugrom would get 1 attack on Tom's Characters, who could not counter-strike. Tom's Characters would then have to move 1 Location away (but could not Scavenge again until the next turn). The Bugrom would pick up the Item at the Hot Springs and take a full Movement (in this case, 3 Locations) this turn (for more on the behavior of Disasters with Items, see Play Phases - Maintenance).
As the Bugrom is a rather wimpy Disaster, however, big Tom decides to take it on.
The Bugrom is a Minor Disaster, so a maximum of 3 Characters can attack it each Combat round. Tom chooses Nene, Little Washu, and the enhanced P-Chan, keeping the weaker Ryo-Ohki out of the fight, unless the Disaster attacks her first.
The +1 Defense bonus P-Chan gets from the Clean Livin' Enhancement does not affect his Health. Little Washu, however, gives a +1 Health bonus to all Characters at her Location, so Attack, Defense, & Health stats are:
| Characters: | Attack: | Defense: | Health: |
|---|---|---|---|
| Nene | 1 | 2 | 2 (+1) = 3 |
| P-Chan + Clean Livin' | 1 (+1) = 2 | 2 (+1) = 3 | 2 (+1) = 3 |
| Little Washu | 2 | 4 | 4 |
| Disaster: | Attack: | Defense: | Health: |
|---|---|---|---|
| Bugrom | 3 | 3 | 3 |
Since none of the Characters have Items, the Bugrom will attack a random Character (pieces of Equipment, like Nene's Control Cube, are not considered Items by Disasters). Use a die to choose a random Character, or pick up all the Characters and shuffle them, letting another player pick one.
Tom must include Ryo-Ohki in the pool of random Characters, even though she is not attacking. If the Bugrom attacks Ryo-Ohki, Tom will have to include her and remove one of the other Characters from the attack.
The Bugrom attacks Nene.
Tom draws 1 Combat card for Nene and 1 for the Bugrom, in that order.
Nene gets a Smash, which multiplies her Attack by 2 (1 x 2 = 2).
The Bugrom gets a Parry, +2 Defense, (3 + 2 = 5).
The Bugrom delivers its attack of 3. Nene's Defense is 2. She survives and takes 1 point of Damage to her Health.
The Character collectively counter-strike the Bugrom with an attack of 6 (2 fromP-Chan, 2 from Nene, and 2 from Little Washu).
With is Combat card bonus, the Bugrom's Defense is 5, so it also survives and takes 1 point of Damage to its Health.
New Attack, Defense, and Health stats are:
| Characters: | Attack: | Defense: | Health: |
|---|---|---|---|
| Nene - round 1 Damage | 1 | 2 | 2 (+1) = 3 (-1) = 2 |
| P-Chan + Clean Livin' | 1 (+1) = 2 | 2 (+1) = 3 | 2 (+1) = 3 |
| Little Washu | 2 | 4 | 4 |
| Disaster: | Attack: | Defense: | Health: |
|---|---|---|---|
| Bugrom | 3 | 3 | 3 (-1) = 2 |
Set the used Combat cards aside (its easiest to keep them face up under your unused Combat cards). Draw 2 new Combat cards for Round 2.
The Bugrom attacks Nene again. Nene gets a Dodge (+1 Defense = 3). The Bugrom gets a Club (+2 Attack = 5).
The Bugrom hits Nene for 5. She takes 2 points of Damage, which lowers her current Health of 2 to below 0, so she is Bonked. Tom moves her over by his Discard pile, but doesn't Discard her. After 1 turn she may be placed back in Tom's hand during the Reload phase.
The Control Cube Nene was carrying remains at the Location. The other Characters can retrieve and use it after Combat is over.
Since attack and defense are simultaneous, however, Nene gets to participate in the counter-strike.
The Characters hit the Bugrom for a total of 5 this round. It takes 2 points of Damage, which just takes its Health to 0. It is Defeated and skitters — screaming inanities about the unfairness of insect life — into the Discard pile.
Tom can now decide to go on or stop Scavenging the Location. If Tom decides to stop Scavenging, that's the end of the turn for those Characters. They'll stay on the Location, but if they want to Scavenge it again on a subsequent turn, they'll need to get a third Female, since Nene was Bonked, the group only has 2. If Tom wants to continue Scavenging, he may do so (the group only needs to meet the requirements when they start the Scavenge).
Unless Disasters say they Ally (e.g. Kodachi Kuno (The Black Rose)), they are combatted one at a time. If none of the Disasters at a Location states it attacks automatically, a player may choose which Disaster to Combat first. Attacking one Disaster does not necessitate Combat with another Disaster at the same Location. Disasters are solitary by nature, and if a Disaster wasn't going to attack you anyway, it won't do so just because you are fighting with another Disaster at the same Location.
If Characters are carrying Items, or if more than 1 Disaster at a Location attacks automatically, Disasters attack in the order they arrived at the Location. If Disasters arrived simultaneously, the most powerful one attacks first. Calculate by the Disaster's Attack ability, then Defense ability, then Movement ability if necessary.
Each Character in the Combat can either attack or protect another Character.
A player must declare target Characters for any of their attacking Characters. 2 Characters can team their attacks against the same target.
If a Character is protecting another Character, the player must declare which other Character is it protecting. The Defense ability of the protecting Character is added to that of the Character it is protecting. A Character which is protecting another Character can not attack. The protecting Character takes half the Damage that gets through the combined Defense, the target takes full Damage.
Amanda is playing with Mousse, Mr. Masamichi Fujisawa, and Detective Mihoshi.
Ben is using Ranma Saotome (boy type) , Tenchi Masaki, Sylia Stingray, and Magcial Girl Pretty Sammy.
| Characters: | Attack: | Defense: | Charm: |
|---|---|---|---|
| Mousse | 3 | 3 | 2 |
| Mr. Fujisawa | 5 / 2 | 5 / 2 | 3 |
| Mihoshi | 2 | 3 | 3 |
Round 3 has info on Fujisawa's "special nature".
| Characters: | Attack: | Defense: | Charm: |
|---|---|---|---|
| Ranma | 3 | 3 | 3 |
| Tenchi | 2 | 2 | 3 |
| Sylia | 2 | 2 | 3 |
| Sammy | 3 | 3 | 4 |
Amanda attacks. Since she is initiating Combat, she gets to decide which of her Characters will attack which of Ben's Characters.
Amanda attacks Sammy with both Mousse and Mihoshi, and has Mr. Fujisawa attack Tenchi.
Since Amanda hasn't initiated Charm Combat, Ben has the option. Ben declares Sammy will charm attack Mr. Fujisawa.
Amanda draws a Combat card for Mr. Fujisawa. Ben draws a Combat card for Sammy. Both use the Charm Combat effects.
Mr. Fujisawa gets a Handsome Lad, which reduces Sammy's Charm by 1. Sammy gets, strangely, a Cool Dude (+1 Charm).
The Combat effects cancel each other. Mr. Fujisawa's Charm is still 3 and Sammy's is 4. With a wink and dreaded hair flip, she befuddles him, gaining control of him for one round.
Sammy orders Mr. Fujisawa to attack Mihoshi.
But suddenly, Amanda reveals Mousse is carrying the Cute Little Dolly, an Item with a +2 Charm bonus. Mousse can Charm Combat either Mr. Fujisawa or Sammy to try to break the charm. He decides to take on Mr. Fujisawa.
Amanda draws a Combat card for Mousse. It is a Shinning Knight (+2 Charm = 4). She draws a Broken Heart for Mr. Fujisawa (-2 Charm = 1). Mousse wins by 3, which is more than twice what Sammy won by. He snaps Mr. Fujisawa out of his befuddlement and cancels Sammy's charming assault.
Physical Combat proceeds. Amanda is still attacking Sammy with Mousse and Mihoshi, and Tenchi with Mr. Fujisawa.
Ben has Ranam and Sammy attack Mihoshi, Sylia protects Sammy (Sylia isn't being attacked so shes free to protect Sammy or Tenchi). Tenchi attacks Mr. Fujisawa, since he was attacked and can't do anything else.
Amanda draws Bash for Mr. Fujisawa (+1 Attack = 6) and a Charge for Mihoshi (+3 Defense = 6).
Ben draws a Punch for Ranma (+2 Attack = 6), but an unfortunate Face Slam for Tenchi (-2 to Tenchi's own Attack = 0).
Mr. Fujisawa hits Tenchi with 6. Tenchi's Defense and Health are 2. Since Tenchi takes 3 times his Health in Damage in this one attack, he is not just Bonked, but Killed and must be Discarded (after his counter-strike).
Due to the Face Slam, Tenchi's total counter-strike on Mr. Fujisawa is 0. Mr. Fujisawa takes no Damage and blows smoke in Tenchi's face. Tenchi is placed in Ben's Discard pile.
Mihoshi reveals a Dimensional Hammer (+2 Attack Equipment that can be played like a Flash Effect). Mihoshi and Mousse hit Sammy for 7. Sylia, protecting Sammy, adds her 2 Defense to Sammy's 3 for a total 5. Sammy's Health remains 3 (equal to her base Defense) regardless of any Defense bonuses. Sammy takes 2 points of Damage to her Health. She survives, but her Health is now 1. Sylia also takes 1 point of Damage. Her Health is now 1.
Ranma attacks Mihoshi. Sammy adds her counter-strike for a total of 9. Mihoshi's Defense is 6 because of the Charge. She takes 3 points of Damage, reducing her Health to 0, and Bonking her. Since she attacked Tenchi, she does not get a counter-strike.
All Combat cards are removed but not Discarded (when all of your Combat cards have been used, re-shuffle them and use them again).
Charm Combat is not an option after Round 1.
| Characters: | Attack: | Defense: | Health: |
|---|---|---|---|
| Mousse | 3 | 3 | 3 |
| Mr. Fujisawa | 5 | 5 | 5 |
| Mihoshi | 2 | 3 | 0 |
| Characters: | Attack: | Defense: | Health: |
|---|---|---|---|
| Ranma | 3 | 3 | 3 |
| Tenchi | 2 | 2 | X |
| Sylia | 2 | 2 | 1 |
| Sammy | 3 | 3 | 1 |
This time Ben decides which of Amanda's Characters his Characters are going to attack.
Ben has Sylia and Sammy attack Mousse. Ranma protects the 1 Health Sylia.
Amanda has Mr. Fujisawa and Mousse both attack Sylia, hoping to take her out this round.
Ben draws a Combat card for Sylia. She gets a Deception, (-2 from her opponents Attack and she gets to draw another Combat card). She gets a Take Cover (+2 Defense = 7, with the 3 from Ranma's protection).
Amanda draws a Parry for Mousse (+2 Defense = 5).
Mr. Fujisawa and Mousse hit Sylia for a total of 7 (9 total -2 from the Deception). Sylia takes no Damage, so her Health remains 1. Ranma takes 1 point of automatic Damage, however, because he was protecting Sylia.
Sylia and Sammy attack Mousse for a total of 5. He takes no Damage.
This round, Mr. Fujisawa's special nature kicks in. Every 3rd turn or Combat round, Mr. Fujisawa is drunk and his abilities are considerably lowered. If Amanda wants to continue Combat, she'll need to do so with Mr. Fujisawa having 2 Attack and 2 Defense this round instead of 5 / 5 (of course, if she decides to run, Ben will get one unanswered attack first).
If a card has a «Unique» category you can only have 1 of that card in your deck.
If a Disaster has a «Horde» category, every like Disaster in play gets +1 to its Attack and Defense. E.g. if you have an Alien Invasion Force and a Bugrom Horde in play at the same time they do not give each other any bonuses. However, if you have a Bugrom Horde and a Bugrom, Type 1, the Type 1 would get +1 to its Attack and Defense. 2 Bugrom Hordes in play at the same time, would each get +1 to Attack and Defense. If you had 2 Bugrom Hordes and 1 Type 1, the Hordes would gain 1 each and the Type 1 would gain 2 to its Attack and Defense.
Disasters with no Movement ability are played on the neareast Characters they would encounter along the Movement path, They take effect that turn.
Some Disasters move a type of card immediately (e.g. Everyone's After Me, "All Disasters in play immediately move to this Location"). All cards of that type with a Movement ability must move immediately to the Location the Disaster land on, no matter how far away they are. Cards that are Off the Field are not affected.
A Disaster card which states "Moves Once" only moves if it is drawn from a Draw pile. When turned up during Scavenging, it doesn't move at all. It stays at the Location it lands on for the remainder of the game or until it is Defeated.
If a Disaster states it will "ally" with another Disaster, this means when it lands on the same Location as another Combat Disaster, the "primary" Disaster adds the "ally" Disaster's bonuses to its own. The ally Disaster will stay with the primary Disaster until the primary Disaster is no longer in play.
(E.g.: Kodachi Kuno (The Black Rose) states "Ally: 2,2." If Kodachi is allied with Kiriya, The Phantom Assassin, Kiriya gains to to her Attack ability and 2 to her Defense ability (raising them both to 7). Characters must defeat the primary Disaster (i.e. Kiriya), before they can attack the ally Disaster (Kodachi). An ally Disaster can not directly attack any Characters if it is with a primary Disaster.
When Characters encounter a primary / ally Disaster pair that have Charm, the Disaster with the highest Charm will automatically charm attack a random Character. If the Character is Charmed, it can not attack either of the Disaster until it is attacked by one of them. If the Character charms the ally Disaster, the primary Disaster doesn't get the ally's bonuses against that Character, although it will get the ally's bonuses against other Characters in Combat. If a Character charms a primary Disaster, play it as a normal charm (see Charm Combat).
To place an extra Haven on the Field, 3 Characters must remain at at Location for 2 full turns doing nothing. On the 3rd turn, you may place the Haven in any open space adjacent to the Location where the Characters have been sitting.
have a Planetary symbol (see Symbol Descriptions) in the lower left of the picture window. A group of Characters can not stop on a Planetary Location unless at least 1 Character in the group has a Planetary symbol or a Power card with the Planetary symbol. Planetary Locations count for Movement for Characters and Disasters. All Disasters can stop on Planetary Locations.
have a Dimensional symbol(see Symbol Descriptions) in the lower left of the picture window. No Character can stop on a Dimensional Location unless that Character has the Dimensional symbol or a Power card with the Dimensional symbol. Dimensional Locations count for Movement for Characters and Disasters. All Disasters can stop on Dimensional Locations.
will list that Defense in the text box. A group of Characters can Scavenge the Location even if they do not have the required skills, if they can attack the Location with more Damage that the Location has Defense.
If a group of Characters without the required skills stops on a Locations with Attack listed in the text box, the Location will Attack all the Characters at the Location from that group. The Location attacks once per turn. If the Characters are in Combat with a Disaster or other Characters, the Location attacks once per Combat round.
Both of the listed skills must be present to Scavenge. (E.g. Island Restaurant lists "Cooking & Acrobatics". You would need a Character with both the "Cooking" skill and the "Acrobatics" skill, or 2 Characters, one with the "Cooking" skill and the other with the "Acrobatics" skill to Scavenge the Restaurant.)
One of the listed skills must be present to Scavenge. (E.g. Pioneer LDC - Mars lists "Music or Tech". Any Character with either the "Music" skill or the "Tech" skill could Scavenge the Location alone (although it would have to be a buff Character to face the Disasters that way).)
Skill must be present "X" times to Scavenge. (E.g. Washu's Lab lists "Genius x2". Julian "Pluto" Moore and Sylia Stingray, both listing the "Genius" skill, could enter together. Washu, with "Genius x2", could naturally Scavenge the Lab alone.
At least 1 Character in any group attempting to Scavenge must have the listed skill, and at least 1 Character in the group must have an Attack ability of at least "X". (E.g. Genom Tower lists "Strength 4+". Ryoga Hibiki, with the "Strength" skill and Attack = 3, and Mr. Panda with Attack = 4 could Scavenge the Tower together. Ryoko, with a "Strength" skill and Attack = 4, could Scavenge the Tower alone.)
A Character which lists "Skill -1" cancels that skill in any Characters at the same Location. (E.g. Akane Tendo lists "Cooking -1".)
Some Disasters state they "steal" a card from Chracters. Some Power cards also let you "steal" cards from Disasters and/or other Characters.
A Character or Disaster attempting to steal a card must be at the same Location as the Character or Disaster with the card to be stolen. The "stealer" may take the card and get 1 full Movement before anyone can attack. (E.g. the Najato (Phantom Prince) Disaster, with a Movement of 3, is 1 to 3 Locations away from you. During its next Maintenance phase, it will move through or land on your Location. If you have 1 or more Items, it will steal a random Item from you and then move 3 more Locations before the end of its Maintenance phase. You may persue it during your Move phase and take the Item back, if you can catch him and Defeat him. If Najato already has an Item, that Item will drop under the Location where Najato stole the Item from your Character.
If you draw Najato during a Scavenge attempt, it will take an Item and move 3 Locations before anything else is done. You may continue Scavenging but you can't pursue Najato because you have no Movement left once you stat Scavenging a Location.
Characters may steal Items from other Characters in the same manner. The stealer takes the Items and gets a full move before anyone can attack it except Disasters. (E.g. your Dr. Tofu moves (during Move phase) through Washu's Lab. Rokkon is there with an Item. You pla a Sticky Fingers Flash Effect that allows you to steal 1 Item. Pick a random Item (the Fingers don't let you make the other player reveal what Items the Character has). Dr. Tofu get his full Movement again before he can be pursued.
If, after stealing an Item, you move to a Location where there is a Combat Disaster, the Disaster will try to take the Item from you as in normal play.
Characters may steal Items from Disasters. However, if a stealing Character already had an Item, it won't get a move after stealing because the Disaster would automatically attack (see Maintenance phase) for the Item the Character had when it stopped to steal.
a vehicle card cannot carry another vehicle card. If a vehicle has Attack and Defense abilities, it may be used in Combat. If a vehicle is in Combat with an opponent, no other Characters may attack that opponent until that vehicle ceases Combat. The Damage done by an opponent is done the the vehicle. If the vehicle takes its Defense in Damage, it must be Discarded. Vehicles do not regenerate their Defense after a Combat. They must be fixed using Flash Effect cards that fix damaged Equipment cards.
This is an alternate method for setting up your playing Field. It is good for beginning players, games with 1 or 3 or more players. It is also much easier to keep track of your cards. In this layout, you set up your Locations in straight lines, which you can daisy chain together to include as many players as you wish.
Shuffle and set aside your Combat cards.
Shuffle your Locations. Place them face up in a line, in any order you choose. Try to place Locations at the edges of your Field that are as difficult as possible to Scavenge for onyone except your Characters.
Place your 1st Haven adjacent to any of your Locations. You may place subsequent Havens adjacent to any Location on the Field.
Shuffle your Items. Place 1 under each Location on your Field. No peeking!
Shuffle your Disaster cards. Place 2 of them under each Location on your Field, face down. No!!! (well, you know the rest).
Choose 4 Starting Characters and place them face up in front of your Field.
Shuffle your Power cards (Equipment, Enhancement, Global Effect, and Flash Effects) and extra Characters and Havens together. This is your Draw pile. Draw 7 cards. This is your beginning hand.
Shuffle your remaining Disasters into your Draw pile.
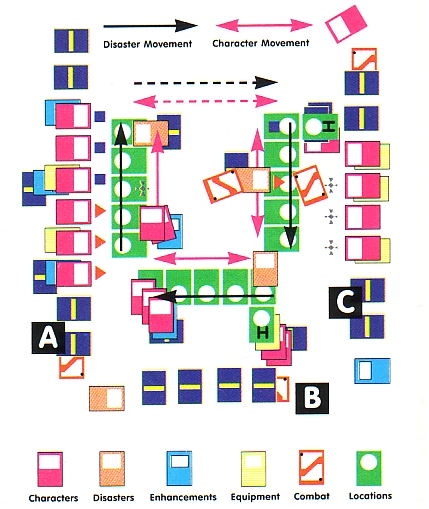
Lines Field Layout for 3 Players (A, B, & C)
Players A and C are using tokens.
A is not using a Haven. A has 2 groups of 3 Characters each in play on C's Field. 1 Character in each group has an Item. 1 group is in Combat with a drawn Disaster, which also has an Item.
B has 5 Characters in play, a group of 2 on A's Field, and a group of 3 on his own Field. 1 of the Characters in that group has an Item. B has stored 1 Item, 1 piece of Equipment and 2 Characters in a Haven.
C has 3 Characters in play on A's Field. 1 of C's Characters is Bonked. C has 1 Character and 2 Items stored in a Haven.
All players are using various Enhancements and Equipment. C is using 1 Global Effect.
There are 4 Disasters in play: 1 is in Combat with A on C's Field; 1 is on A's Field; 1 is on B's Field; and 1 is played Off the Field.
After A's Combat end, the players will move on the Equip, Move, and Scavenge.
From AnimeCafe, special thanks to:
Rick Alonzo of Anime Wink, Enrique Galyez of Banzai Comics, Stephan Tang for a great home page, and Tom Clancy because if we hadn't written it down, it never would have happened.
From PAnime, thanks to: Ernie Chapa and John Faries, Kumi Hufferd, Robert Woodhead, Joanne White, Kevin and Pamela Mosby, Scott Mauriello and Anime Crash, Chris Shorb and Third Planet.
Created by AnimeCafe, Inc. The Twisted minds at AC are Jon Healy, Keith Pinster, & Josh Ritter.
Produced by Pioneer Entertainment, Animation Group. Hideki Goto, Tod Harrick, Hiroe Tsukamoto, Yuji Moriya.
Special Pioneer thanks also to Naoju Nakamura.
Package Design by Jess "Biff" Butler & John Chambers of Mind Meld, Inc.
Manufactured by The Upper Deck Co. (Carlsbad, CA)
Questions? Contact Pioneer at:
Ani-Mayhem
c/o Pioneer Entertainment
2265 E. 220th Street
Long Beach, CA 90810
Or call out toll-free customer service number:
1-800-421-1621
or e-mail us at:
panime@primenet.com
You may also contact AnimeCafe by e-mail at:
AnimeCafe@aol.com
This document may be copied and distributed freely, as long as no information is changed, added, or deleted.
copyright Artmic, Inc. and Youmex, Inc. 1987-1990, all rights reserved; English subtitled / dubbed versions, copyright AnimEigo, Inc. 1991-1995, all rights reserved.
© 1995 AIC • Pioneer LDC, Inc.
© Rumiko Takahashi / Shogakukan, Inc. / Kitty / Fuji TV, exclusively licensed throughout the United States and Canana by Viz Communications, Inc., all rights reserved.
© 1992 AIC • Pioneer LDC, Inc.
To experience more of the exciting worlds of Japanese Animation, ask your local comic, game, or video retailer about Anime videos on VHS and Laserdisc from AnimEigo, Pioneer Entertainment, and Viz Video.
Ani-Mayhem © 1995 Pioneer Entertainment (USA) L.P.
ani-mayhem is a registered trademark.
Ask your Ani-Mayhem retailer about a free in-store demonstration and exclusive Ani-Mayhem promotional cards.
Thanks: to all the fine store who've host Ani-Mayhem demos.
If you want to know the location of the an Ani-Mayhem retailer near you, if you are a store that wants to host an Ani-Mayhem demo, or to get on the mailing list for free PAC de America fan newsletter, call us at:
1-800-421-1621
You may Discard any card in your hand or of your Characters in your Haven.
Draw until you reach 7 cards in your hand or you Draw a Disaster than can affect the Field.
Move Disasters. Update Disaster times for Disasters with time limits.
Play 1 Equipment into your Haven. Play 1 Enhancement on a Character. Play 1 Global Effect.
Move any Characters up to their Movement abilitiy.
Attempt to Scavenge a Location if all skills required are at the Location.
Disaster or Characters initiating Combat declare who it is they are attacking.
Defending Characters decalre who is counter-striking.
Any Characters not attacking or counter-striking decide if and who they are protecting.
The primary Disaster and each Character being attack get a Combat card.
Calculate attackers' total Attack. Subtract defender's Defense. Remainder is Damage to the defender's Health.
Rules update as of March 31, 1997.